Rope Cage - bondage tutorial


articles and tutorials Basic Bondage Harnesses, breast bondage tutorial
The Rope Cage is yet another elegant tie that utilizes the Double Coin Knot in its construction. When completed, the tie comfortably limits a partner’s ability to move, while at the same time allowing him or her to be pivoted freely on the feet like a “willow in the wind.” Since it consumes a lot of rope, this tie can be a bit cumbersome for beginners. However, with a little practice, tying it will soon be a breeze!
Rope length: 80 to 100 feet
Rope diameter: 3/8 inch to 7/16 inch

First place the very middle of the rope around the back of your partner’s neck. At chest level, tie a Double Coin Knot.
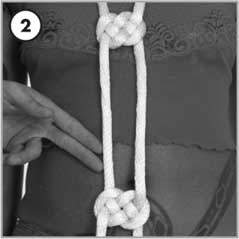
At your partner’s belly button, tie another Double Coin Knot.

Then, at your partner’s knees, tie another…
and at his or her lower calves, tie another.
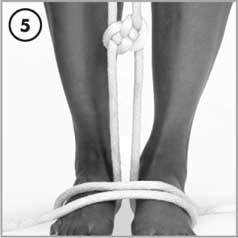
Bring the ends straight down and have your partner stand (feet together) on each rope, bringing each rope off to its side. Now wrap each rope over both feet.

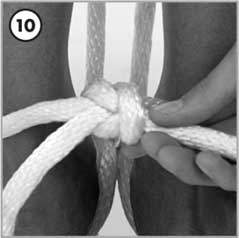
Take the ends of the rope, and split one up behind and one up the front of the wrapped ropes.
Split the rope ends over the back and the front side of the wrapped ropes.
Tie a basic overhand knot to pinch the wraps together.
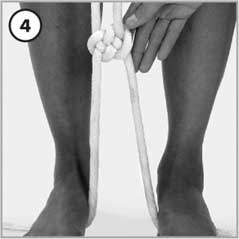
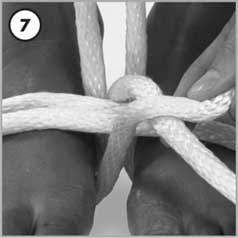
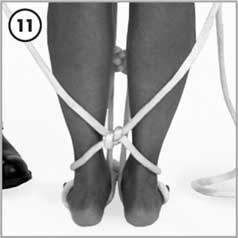
At this point, split the ends of the rope in opposite directions around your partner’s ankles until you reach the back.

Tie a basic Square Knot behind your partner’s ankles.
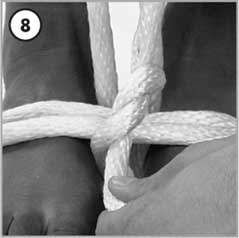
Split both respective rope ends and bring them around toward the front of your partner’s lower shins.
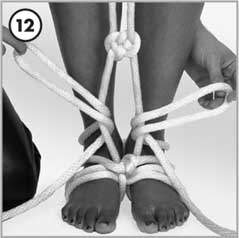
Then weave each rope under each vertical rope on its respective side, pulling it through, above the overhand knot. Pull the ropes apart to make a diamond.
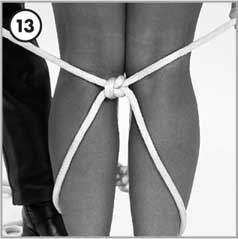
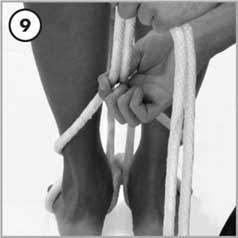
Split both respective ropes, pulling them around the back of your partner’s calves. Tie a basic Square Knot behind the knees.
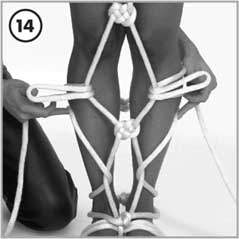
Split both respective ropes around to the front of your partner’s upper shins. Pull the ropes apart between the legs, above the Double Coin Knot, to form another diamond.
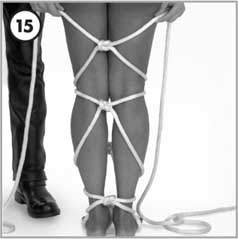
Split both respective ropes around toward the back of your partner’s thighs. Tie a basic Square Knot.
Split both respective ropes around to the front of the thighs. Pull the ropes apart between the thighs and above the Double Coin Knot to form another diamond.

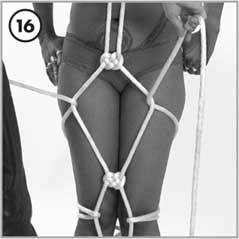
Split both respective ropes around to the small of your partner’s back. Tie a basic Square Knot.
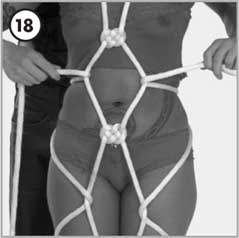
Split both respective ropes around to the front of your partner’s waist. Pull the ropes apart between the Double Coin Knots to form another diamond.
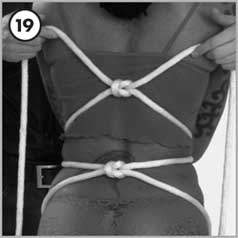
Split both respective ropes around to the middle of your partner’s back. Tie a basic Square Knot.

Split both respective ropes around to the front of your partner’s chest. Pull the ropes apart above the breast line above the Double Coin Knot.
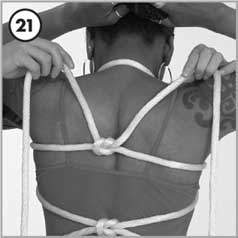
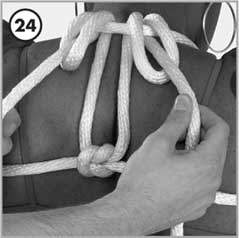
Split both respective ropes around to your partner’s shoulder blades. Tie a basic Square Knot. Bring the ropes up to the back of the neck.
Make a bight in each rope and pull each respective bight up and under the rope that’s around the back of the neck.
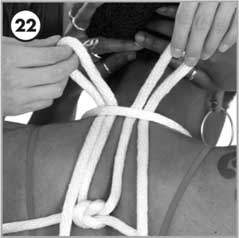
Tie off the piece by pulling each respective loose end all the way through its respective bight.
Carefully pull each rope until its respective bight collapses onto it…
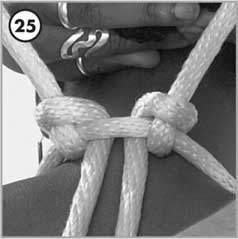
until tight!
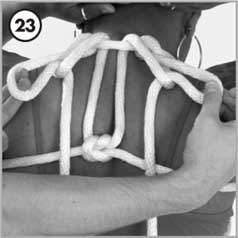
The loose ends can then be tied off to an overhead eyebolt or looped around a ceiling beam, holding the piece tight and your partner upright.
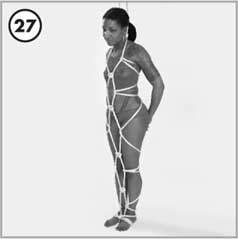
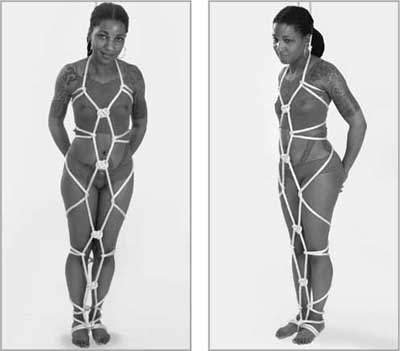
Whether viewed from the front…
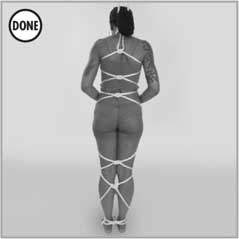
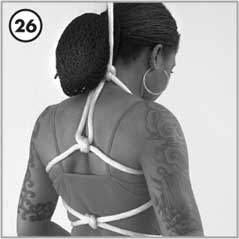
or the back, the piece should look clean and well fitting, while still allowing plenty of accessibility.