Rope Corsets and Erotic Macrame

articles and tutorials shibari and Japanese Bondage Shibari rope bondage
Having tackled the basics of Japanese-style rope bondage, let’s look at a category of ties inspired by Shibari—Erotic Macrame. This category of rope bondage is a blend of Japanese-inspired rope bondage, macrame, and rope as fashion.
One of the most striking uses for erotic macrame is the rope corset. Ever noticed how expensive corsets are? Now you can make your own for a fraction of the cost. This design of rope corset allows for the creation of wide variety of styles once you have these basic concepts down.
We will cover the following applications:
You can make rope corsets as fancy or simple as you like them. Every single time you apply a rope corset, it will be slightly different. No two rope corsets are quite the same. This is not a flaw, but an opportunity to show that you spent the time and energy to make this one unique.
If you are interested, you can also break out your old macrame books from the 1970s or modern survivalist books on para-cord tying to get your knotty self going at any point with these techniques. Try combining these patterns with the ideas presented here and find your own approach to rope corsets.
Watch out for your partner’s breathing as you use corsets, as the restriction of the diaphragm affects some Bottoms quickly, and others over time. Keep in mind that if it took you 20 minutes to craft a corset, it will take 10-20 minutes to untie it. Have those emergency scissors around just in case, and encourage the Bottom to sit as the Top calmly unties in such situations.
Basic Rope Corset
Basic Rope Corsets are essentially a series of lark’s heads down the torso. By learning to construct this classical form, you will begin developing the skills needed for more advanced variations. In this version, the spine of lark’s heads is down the center front of the torso, but the same design and technique can allow you to have the spine down the center back or side of the corset. Keeping the rope spine straight is the key to this pattern.
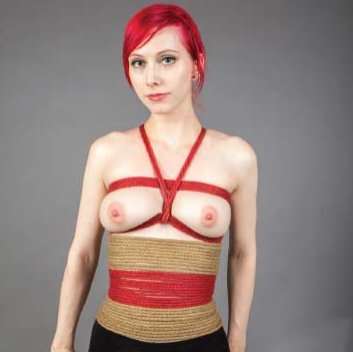
When crafting rope corsets, mixing media allows for alternating colors, shine, and texture. Material diversity can be quite eye-catching. On the other hand, using all one type of rope creates the visual of a more classic fabric corset. Try making both styles, and see what appeals more to you and your partner.
This rope corset is constructed using four total pieces of 25-30ft (8-10 meter) MFP and jute rope.
Identify column.Choose a column. The most common column for rope corsets is the torso, but as you will see further in this chapter, almost any column will do. In the case of torsos, keep an eye out for rigging challenges such as additional midsection curves, bruises and spinal protrusions. Some bodies are not suited to long rope corsets—consider building a rope cincher or belt instead.
 Find your rope.
The easiest length of rope to work with is 25-40ft (8-12 meters) in length. Anything longer than this may get tangled as you weave back and forth, and with anything shorter, you will be splicing on additional pieces every other wrap. By using multiple pieces of rope, the option is present to create colorful patterns. You are welcome to use longer ropes with these points in mind.
 Find the bight.
Fold your rope in half and hold the rope by the bight.


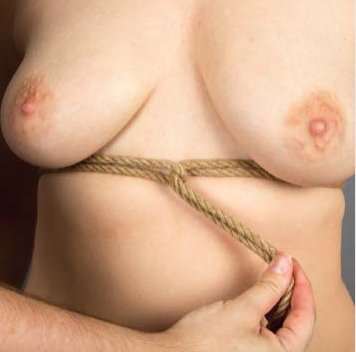 Wrap and create lark’s head.
With the bight located at the front center of the torso, wrap the doubled line around the torso with the ropes just under the breasts or pectoral mass. Pull the ends through the bight, then pull the ends back in the direction that they came from to create reverse tension. The lines around the torso should be snug but not restrictive.
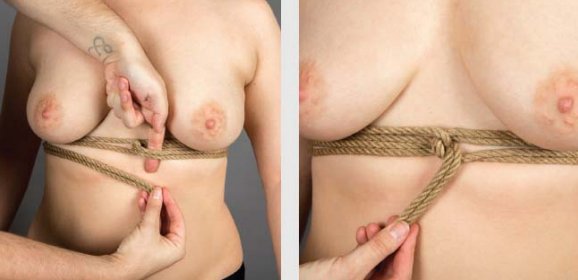 Create second lark’s head.
Lay the second set of lines below the first set. When you come back to the first lark’s head, you will see that by wrapping a second time, you have created a new loop that rope can be tucked through. Pull the ends through this loop, then pull up and back in the direction the line came from.

 Repeat step 5 until you run out of rope.
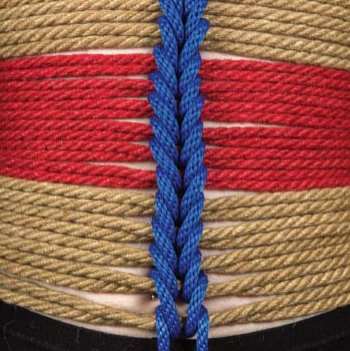
Wrap just below the last line. Make sure to keep tension even with each line, and straighten the spine of lark’s heads that form at the center of the torso.
 Continue until you reach the bottom of the corset
Continue to wrap lines in alternating directions while maintaining a straight spine of lark’s heads at the center of the torso and even tension on each wrap. Pause every few lines to make sure the lines are touching at the side and that you are covering up any knots from adding new rope by laying lines over the knots to conceal them. The corset has reached the bottom when it looks right to you.
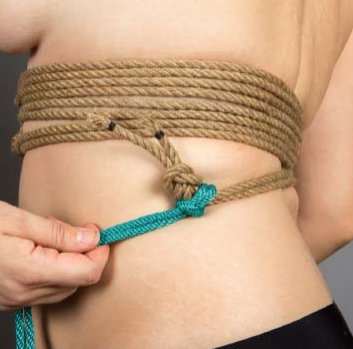
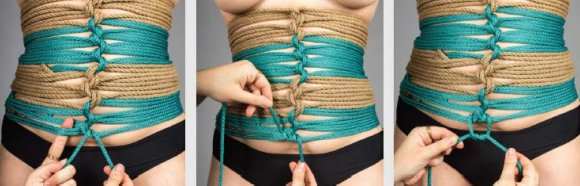 Tie off wraps.
When you reach the end of your corset, split the two lines in your hand. One will go through the bight at the base of the corset, just as if you were about to do an additional wrap. Create a square knot by going left over right, then right over left. Tuck the ends of the square knot underneath the base of the corset.
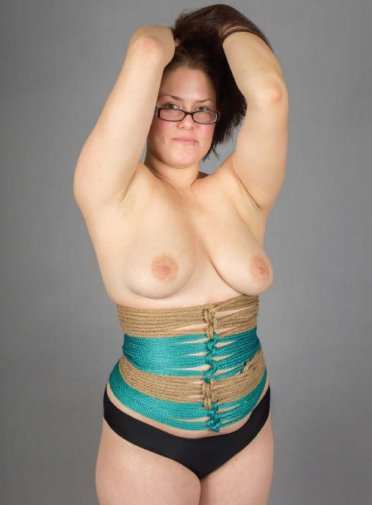
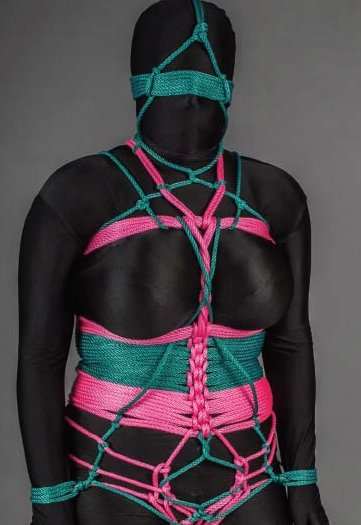
Double Spine Rope Corset
The primary complaint about the Basic Rope Corset is that lines of rope will compact upon one another with movement, no matter the size of the person you are tying. This variation addresses part of this issue by anchoring the layers of lines at the front and back of each line, not just at one point on each wrap. Additional spines can be added as desired, creating even more support and stability.
But take note—each time an additional spine is added, the rope corset will get tighter. Have a pair of EMT shears available just in case the corseted person needs to get out fast.
This specific corset was built using four 25-30ft (8-10 meter) pieces of jute, and 1 piece of 25-30ft (8-10 meter) MFP.
 Build harness
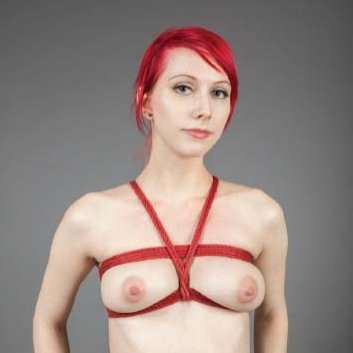
Create the Basic Chest Harness. This corset is an extension of that tie.

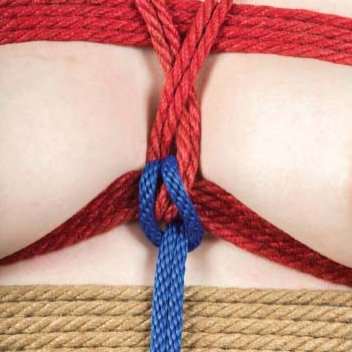
 Attach lark’s head to Main Body.
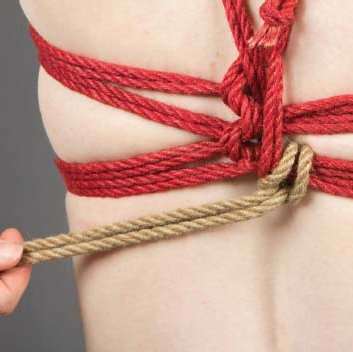
Attach a new piece of line (see page 53) to the center back of the chest harness. For dramatic effect, this is an opportunity to change colors of rope or textures of line, though staying with the same width of line is encouraged.
 Wrap torso under chest harness and create lark’s head.
Wrap directly underneath the chest harness. Once you have returned to the center back, pull the ends up through the newly created gap on the back, then pull down and back in the direction the line came from.
 Wrap around torso and create repeating lark’s heads.
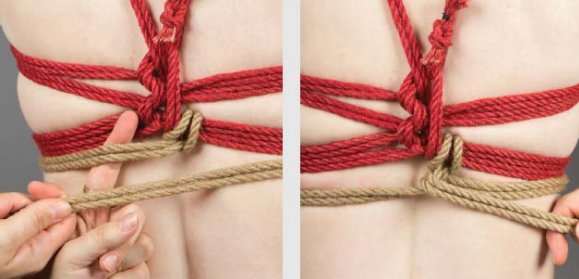
Lay the second set of lines below the first set. When you come back to the first lark’s head of the corset segment, you will see that by wrapping a second time, you have created a new loop that rope can be tucked up through, just as you did with the Chest Harness or Basic Rope Corset. Maintain even tension as you repeat this pattern, straightening the spine of the corset down the back towards the rump as you go.
Each time you run out of rope, add more rope. Changing colors creates drama, or use all one tone and texture for a continuous look. Pause every few lines to make sure that the lines are touching at the side and that you are covering up any knots from adding new rope by laying lines over the knots to conceal them. When you reach the bottom of the corset, tie off the line with step 8 from the Basic Rope Corset.
 Attach lark’s head to center.
Attach a new rope to the center front of the chest harness. For dramatic effect, this is an opportunity to change colors of rope or textures of line, though staying with the same width of line is preferable for a more classically attractive rope corset.
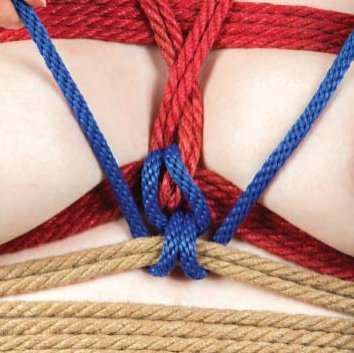 Begin laying second spine.
Lay the doubled line over the first two lines of the corset. Tuck each end up underneath the first two lines of the corset, one on each side of the spine that is being built.
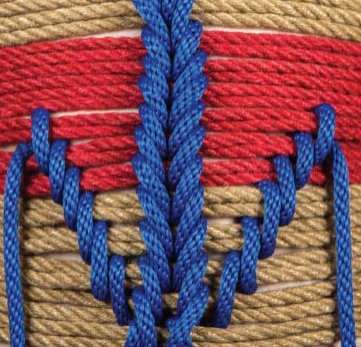
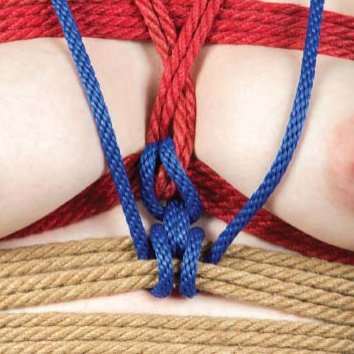 Create center pattern.
Lay the separated spine line over the next two wraps of the corset. Tuck each end up underneath the previous wrap.
 Continue herringbone spine.
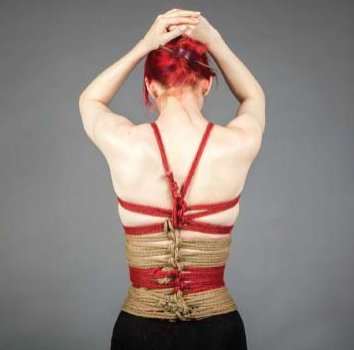
Repeat this two sets down and one set up pattern, making sure to keep the spine that is being set in a straight line down the center front of the torso.
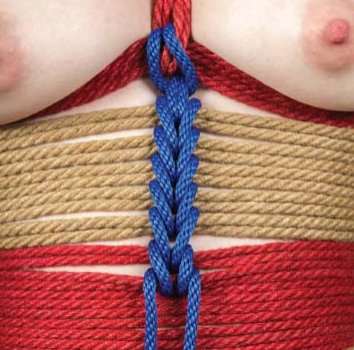
By the bottom of the corset you with have an elegant herringbone-patterned spine down the center front of the torso. Tie off the ends of the rope with a square knot or other technique, and do lots of wraps or twists to use up the remaining rope.
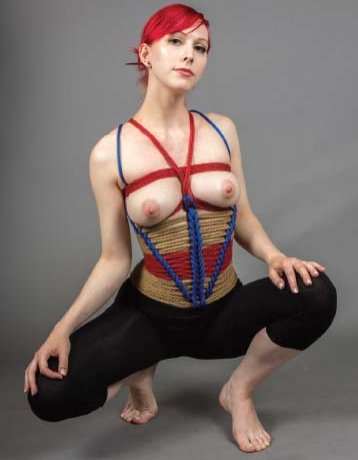
Fancy Rope Corsets
Is the Double Spine Rope Corset not ornate enough for you? Perhaps you want to design something truly unique for a party, or want to weave a very restrictive design on your lover to control their posture (remember those EMT shears!).
Here I have done additional looping with a single blue line back up the torso in a diagonal pattern on each side of the front center spine. Having reached the top, each single line was taken over a shoulder, tied off to the back of the chest harness, and then brought around to the front to pull the lines off the clavicle.
 Additional ideas include:
- Adding spines on each side of the corset
- Creating diamonds by looping in different directions
- Making multi-media art by doing all decoration with ribbon, fabric, latex stripping, thin line, plastic, or silk cording
- Corseting down the entire body for hobble skirts or rope mummification
- Weaving spirals, loops, hearts (see page 25), and other patterns into the lines
- Finding inspiration from a wide variety of macrame or fiber craft books
Go out and have fun, and see where you can create rope corsets. Let your creativity fly!
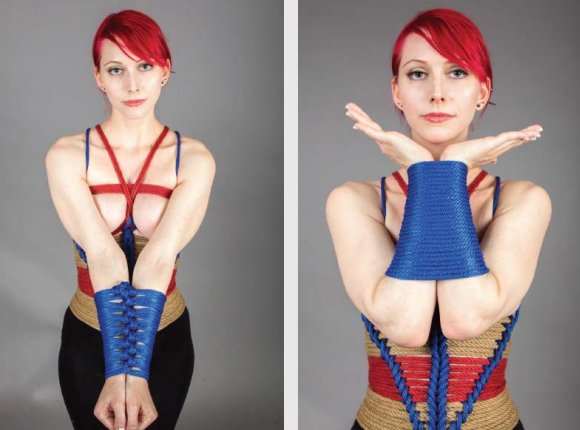
Rope Gauntlets
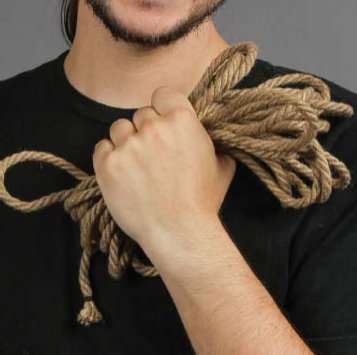
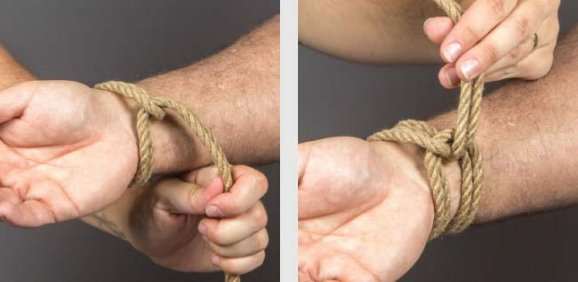
Who says that rope corsets can only be woven on the torso? Rope Gauntlets are a great way to wear rope to a fetish party that can then be taken off to tie up a delicious morsel—or be a practical fashion accessory for anyone who enjoys erotic wrestling. Follow the steps in the Basic Rope Corset, starting at the wrist with a slightly loose wrap.
Build up the arms with repeating lark’s heads, and tie off with a half hitch when you run out of rope. Tuck the loose ends underneath the bondage to create a smooth line. Repeat on the other arm. Combining a pair of rope gauntlets with head bondage or a corset belt can create a very sexy and intimidating look. It is also a great way for a Top to carry around their rope at a party!
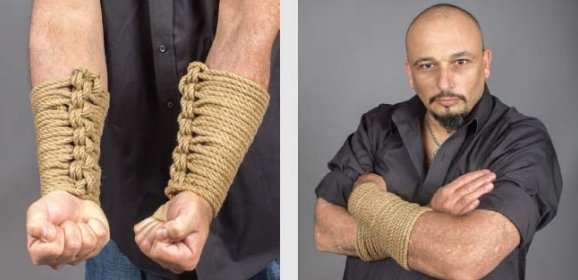
Gauntlet Bondage
Rope corsets can also be used as a form of restraint. Create a corset around two legs, two forearms, or run a corset around the waist and both arms at the same time. In this example forearms have been corseted together to finish the bound look with a Fancy Rope Corset.
Make sure to not tie off on only one loop or strand of the gauntlet bondage, lest the gauntlets keep tightening down from the pressure. If you want to attach the Gauntlet Bondage to other pieces of equipment or bound bodies, try sliding rope underneath three or four of the sets of rope before coming back up, enabling pressure distribution. Gauntlet Bondage can also be a lot of fun making a corset around two people’s torsos at once.