Japanese rope bondage: basic techniques and knots

articles and tutorials shibari and Japanese Bondage Traditional Japanese rope bondage
Knots
Now usually the first thing I hear from people about rope bondage is they were not in the boy scouts so they don't know to tie tons of knots. Well there are people with a knot fetish who love to use tons of different knots, but I just love tying up people and having fun fetish, so I only use (and pretty much only know) 3 knots. The square knot, and a half-hitch and the larks head. All 3 of these are very simple and easy to do.
Square Knot. If you can tie your shoes, you can make a square knot. Its just like the first part of tying your shoes, and for the second part you repeat the first half in the opposite direction... Remember "right over left, left over right ... makes a square knot nice a tight!" If you do it wrong, right over left, right over left, you get a granny knot which slips! very bad!
 Animated Square Knot.
 Square Knot Profile.
(see how it is clean and both tails are on the same side, and it wont slip when pulled)
 Granny Knot Profile.
(see how the tails go to each side, and the knot is diagonal, your DON'T want that!)
Half Hitch (and Hitch and a Half). The half hitch is a little harder but also very useful. You wrap the rope around what you going to bind too, fold it over itself, then push a loop under the first part, the pull the tails through the loop and pull tight. If you do 3 half hitches, we call that a "hitch and a half". its possible for a half hitch to slip, but if you do 3 in a row, its easy and fast to make, and virtually impossible to come apart.
Larks Head: The thing I use the most, which really is not a knot, is called a larks head. Basically you wrap the rope around the body or limp, then put the tails the the bite ( folded mid point ) from the opposite direction and pulling the tails in the opposite direction till snug.

So using these 3 knots, you can do almost any kind of Japanese rope bondage.
Basic Techniques
There are 3 basic techniques used for Japanese rope bondage. Folding, banding and layering.
Folding / Bight: is when you find the center of the rope, and fold the 2 halves over creating a bite and 2 tails. Almost all Japanese rope bondage is based of this technique. It makes the rope act like its twice as wide (so 3/8" rope acts as its 3/4" wide), makes it faster to use up the rope and creates larks heads easy.


Banding: is when you double, triple etc. up the rope up to make it act as it wider then it is to spread out pressure on the surface of the skin. Folding is a version of banding, and you can use a folded rope to create more banding. So a 3/8" rope can act as is 3/4", 1 1/4", 2 1/2" wide etc.

Layering: is when you take several different pieces of rope or techniques and layer them on top of each other, or have them effect each other. For example, making a chest harness, then taking another rope, and using one the ends to tie to the chest harness, and the other end to a beam. The Boola-Boola Below is an example of layering in one technique.
Boola-Boola (Turn band with and under and over square knot)
Boola-Boola: As its was coined by Numinous at Black Rose '02 and stuck (I called it the Japanese suspension cuff knot thingy myself, but I like boola-boola better), is probably the most important technique of Japanese rope bondage in my opinion by far!!! Its a mix of the technique of Banding. Layering and a Square knot all in one. And by putting them together (layering them) you are basically making a suspension cuff out of rope. You can do this with a Single strand of rope (show above for simplicity), but I suggest you use a folded piece of rope (as in the right photo) with the bite as the part wrapping around the limb and making the square knot with. For a limb, you will need about 1.5 to 2' of rope to do this, and for the body, about 10. And when you finish it off, you want the bite to be sticking out of the square knot by about 1.5 to 2". The tail part of the rope can be as long as you want so it can reach to whatever you need to tie too. Then nice thing about this knot, is if you need to get your sub/slave/bottom out of it fast, you just have to untie the square knot and its done. Another advantage to this knot is if you play with an escape artist, you put the tails through the bite, and then its impossible for them to untie the knot!

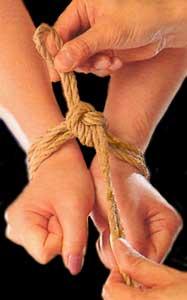
To Make a Boola-Boola you start off by bringing the bite, and wrapping it around the body part as many times as you want, 2-3 full turns are usually best. Then fold the bite over the tails (opposite end), then fold it under band you created and pull the bite through to the original side it came from. This prevents the band from tightening on the limb under stress. Then tie a square knot (see far above) on top of the band . This technique is good for making a rope suspension cuff, and probably the most important thing with doing suspensions.