One-Column japanese ties, terminology and concepts


articles and tutorials shibari and Japanese Bondage Traditional Japanese rope bondage
Before we go through how to tie, here are a few basic terms:
Terminology and Concepts
Bight: When a rope is bent double, the point at which the rope folds is called a bight. For the rest of this text, the bight is referring to the bight formed at the middle of the rope when the rope is folded in half.
Cinch: Any rope or action that pulls two pieces of line together. For example, if you have a group of lines running around a pair of wrists, and then you have another line that tightens those wrists towards each other, you have just “cinched” the wrists together.
Column: A column is anything we can wrap rope around: a thigh, an upper arm, a chair leg, etc. Thus, a one-column tie is not a wrist cuff—it is also an ankle cuff, a collar, and a cock-and-ball harness.
Ends: The bit on the rope where the rope stops and the air begins. Ends can be knotted, whipped, dipped, melted, or left to fray.
Line: Slang for a piece of rope, these terms is used interchangeably in the instructional material in this book.
Skein: Also known as a hank or bundle, this term referrs to a single piece of rope when it is coiled up onto itself for easy storage or access. Bundling your rope can reduce the chance of tangling.
Symmetry: To have something be “symmetrical” means it is balanced from side to side. The left side has as many wraps as the right side, for example. Asymmetrical bondage is fun to explore, but for ease of education, most ties in this book are of a symmetrical or near-symmetrical nature.
Tension: The pull or tautness on a rope. When you wrap a rope around a column, it needs to have even tension on every wrap. Having one wrap tight and the next one loose can make your bondage slip, bite into the flesh or cause other difficulties.
Twists: When a rope overlaps itself, gets pulled around itself, or in general does not lay flat. If a rope crosses on top of another rope, it is less comfortable (or can cut off circulation faster) because instead of distributing pressure, the single rope is on the bottom holds the entire pressure for the tie.
Wrap: Any time a line (or in most cases in this text, a pair of lines) is wound around something—whether it is one column, two columns, or anything else—and meets back up with itself, it is considered a wrap.
With these definitions in mind, it is time to get our hands on the rope and start tying!
Tutorial
Affectionately known as the boola-boola knot or shibari cuff, this simple tie has a wide variety of applications. It can be tied as a collar and leash, or used to wrap around a thigh to help pull legs back during sexual play.
To have a bit of sexy fun, try putting a wrist cuff on someone and carefully move them around by that cuff to see what poses you can get into. The versatility of just one cuff can fold them over, stretch their body out, or put their hands anywhere the two of you desire.
Another fun game to play with a One-Column Tie is to have a Top bind each of the Bottom’s ankles and hand the loose ends to the Bottom. Let the Bottom show you where they would like to take their own body.
The tie here is shown using a 10-15ft (3-5 meter) length of 6mm jute.
Identify column and find rope
Choose a column. Identify anything you need to avoid, such as joints or the front of a neck.
Find the right piece of rope for what you want to tie— 10ft (3+ meters) for binding a wrist to a bed, 25-30ft (8-10 meters) for attaching a thigh up to a headboard. Having rope left over is preferable to having less rope than needed, so err on the side of extravagance when unsure.
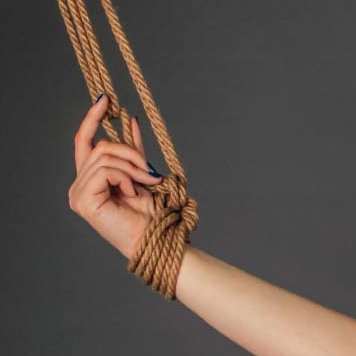
Find the bight
Fold your rope in half and find the bight. Make sure there are no knots in the line and no debris trapped in the rope. Feel the rope for splinters and see what the rope’s burn speed is.
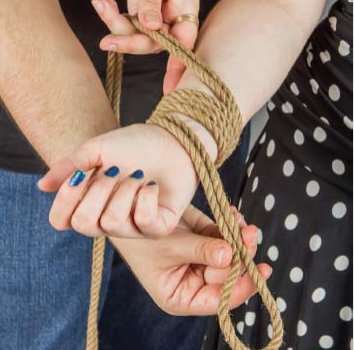
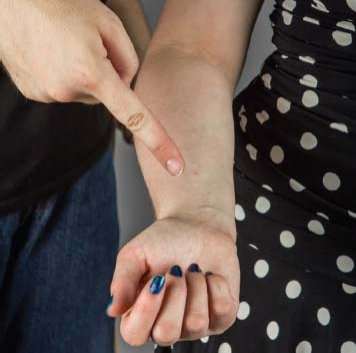
Wrap column
8-12 inches (20-30 cm) from the bight, begin wrapping the folded line around the column. Not too tight mind you; just snug enough to keep the rope from moving. Wrap the column three times to distribute pressure evenly on that column. When wrapped, the rope’s lines will resemble the letter “N” or “Z”.
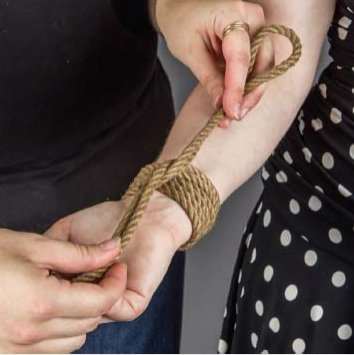
Twist the bight and ends
In a wrist tie, if the bight end was near the hand, it will now be pointing towards the elbow.

Tuck the bight
Tuck the bight underneath all of the wraps and pull it through.
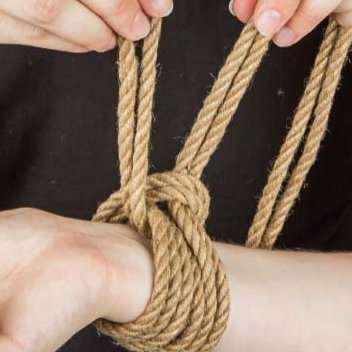
Bring both lines up
This is a great time to see if the wrist ties are as tight as you want. If not, pull the ropes you are holding apart, snug the whole thing down, then bring the lines up once more.
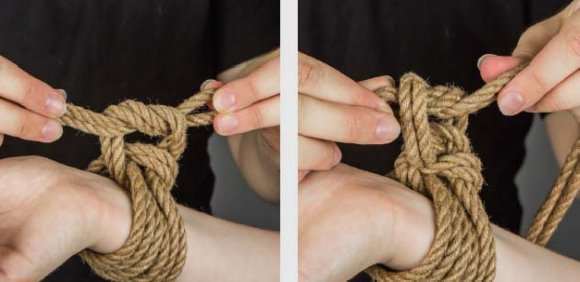
Tie a square knot
Using the bight as one “end” and the loose line as the other “end,” tie a square knot (left over right, then right over left). A finished square knot (also known as a reef knot) will resemble the number 8 when viewed from the side. If you are using a slippery line like nylon or MFP, feel free to add an extra overhand knot on top of the square knot to keep it snug.

The loop formed by the bight can be used to create a pulley or to tie other lines to, such as running the ends through an overhead point and then back down to the bight loop, and up again. This is perfect for any form of spread-eagle-type ties.
Congratulations! You’ve just tied your first bit of Japanese-style rope bondage.