BDSM Workshop: Design Practices


articles and tutorials BDSM workshop
This page will ramble on about a number of topics related to design. These are my opinions, and you're welcome to disagree.
Design Concept
Every design, from the simple to the complex, begins with a concept. As a start, I would suggest you write yours down (yes, on paper!). Doing so forces you to think about what you really want to accomplish with the piece you're designing.
A concept can be very simple: "I’d like a piece of equipment to securely restrain someone’s arms behind their back." You might revisit it later and revise, but get something down on paper. This is like your guiding vision. Good sources of ideas include pictures, other people's work, positioning a live person, and simple imagination.
Design Objectives and Constraints
Next, document your objectives. Some should be almost universal. You might consider these the four S's:
- Strength. Always build your furniture sturdy enough for any eventuality. Strength is influenced by design, materials, construction, and the condition of the piece. The best designed and built piece with fail in strength if it has rotted for years. Select the right materials and thicknesses.
- Safety. This goes well beyond just strength, and is heavily influenced by design. Are parts sticking out to skewer or scrape someone? What about holes that a foot could get caught in? Can you safely get someone on and off the piece, even if they're unconscious (hopefully only a concern for "off" ;)?
- Stability. Is your design susceptible to tipping? Is the base wide enough? Do any folding parts lock in place securely?
- Simplicity. Can your design be made simpler? Avoid compound angles where possible, ulness you like meticulously fitting parts together. Can I elimiante a part here or there?
More personal objectives also impact design:
- Portability. Do you need to move the piece in a Pinto, or perhaps hide it quickly in a closet? Being able to break down your furniture in nice, but usually forces a trade-off in strength and simplicity. If you understand your needs, answer questions like how easily must it break-down, how long can the longest part be, and how much can it weigh.
- Aesthetics. Design asthetics are, of course, a matter of taste. If style or fit with decor are important to you, identify that up-front and design with it in mind. Do you have a mission style done in oak? Design and build your furniture in harmony, perhaps.
- Space. How much space can you dedicate to this piece?
- Flexibility. Do you have one person that you'll put on this piece? Or must you allow for a wide range of people? If your primary partner is seven feet tall, you'd better take that into account when designing your St. Andrew's Cross.
Again, you want to write these down! Force yourself to put them into specific words. Complete your set of objectives by prioritizing them. Understand which ones are critical and which are nice to have.
Follow the same process (write & prioritize) with constraints. Contraints are things that limit your design and materials. If the trunk of your car is four feet wide and you want to move the piece in your trunk, that is a constraint... you can't have a single part longer/wider than 4'. Cost, required techniques, and multi-partner saftey can all lead to constraints.
Design Process
Designing furniture, BDSM or otherwise, is something of an art form unless you're working from an existing design. When designing a piece of furniture, start with the general purpose and shape. In what positions might you want the piece to hold its occupant? Have other people built similar things? Find as many examples as you can, and carefully examine their designs. Wonderful pieces can be built by synthesizing other people's ideas into a unique result.
Draw stick people in the positions you want your piece to enforce. This should give you an idea of the shape that's required. After roughing-out a shape for the piece, sketch some options that flesh it out. Draw in legs, cross-bars, and braces in as many configurations as you can imagine. Create as many options as possible, then narrow them down to those that look most practical.
About this point, pay special attention to the structural parts of the piece. What members bear weight, and how much? Don't forget to add in a safety factor of at least 2x, and perhaps as much as 10x depending on the consequences of failure. Don't ignore load while getting on or off. For example, consider a cross with platforms for the feet. Each platform will bear up to half the person's weight, right? Wrong! Not only may the occupant shift and push, but such a platform might be used as a step while mounting the cross. It needs to bear the full weight of the person, with a 3-5x multiplier (falling 5" to the ground isn't terribly dangerous). You might design that platform to hold 1000 pounds peak load!
Rule: our materials are more resistant to compression than bending. Consider a fishing rod. First, stand it on the floor and try to compress it so it is shorter. Next, place it horizontally across two supports and try to bend it downwards. The same is true of wood and metal. Transfer weight cleanly to vertical supports that hold it against compression.
Rule: the long side goes up-and-down. Get an 8 foot 2x4 and two cinder blocks. Place a cinder block at each end of the board, and lay the board across them. First, do so with the 4" side vertical. Jump up and down on the middle of the board. Next, spin the board so the 2" side is vertical. Jump again. Which orientation is stronger? Make sure you do this test in the order indicated, so you actually get to do both parts of the test! Try to design with load-bearing boards long side up-and-down.
One last experiment: get two pieces of 2x4, a 1 foot and an 8 foot. Use any means you'd like to try and bend both along their length. Which bent more easily? Rule: longer horizontal spans of the same material hold less weight. Design accordingly, either by minimizing horizontal spans or beefing them up.
Finish layout on the structure. Draw the way specific parts connect to each other. Joints are critical in this situation, and must be layed out properly. Consider the following simple ways to construct a right angle. Assume the horizontal part directly bears weight, and the vertical is a leg supporting it:
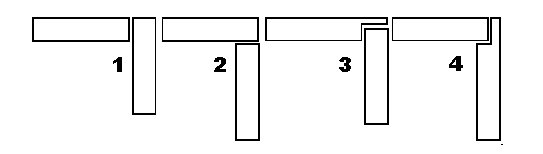
In the first diagram, all weight transfer is bourne by fasteners holding the joint. Number 2 is much stronger, as the weight is transfered directly onto the upright support. 3 and 4 are recessed butt joint, nice as they conceal the end grain to a large degree. 4 is much stronger, since a small portion of the cross member in 3 holds all the load. The more direct transfer through joints, the better.
Think about the user interface. What parts of the victim's body are going to take the weight? How are you going to keep those parts comfortable? You may need to attach weight-bearing accessories to the core structure.Generally:
- Wider is better. The more body surface bearing weight, the more comfortable.
- The more natural a position, the longer it can be maintained.
- Feet, hands, and buttocks are meant to bear weight for an extended period. Use them when possible.
- If a person can shift from one support to another, they'll be comfortable longer.
- Padded resting places are a really good idea.
Pay some attention to stability of the base. A couple of guidelines:
- A stable unit will have a base at least half its height.
- The taller the unit, the wider the base.
- The higher the center of gravity, the wider the base.
- The more an occupant can throw their weight around, the wider the base.
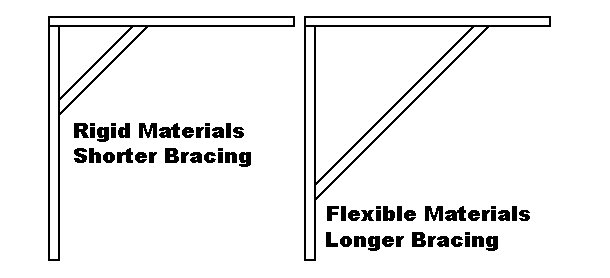
Most BDSM furniture should be rigid. It shouldn't sway very much in any direction. This will require bracing of some sort, generally either metal angle brackets or 45-degree bracing. The latter is much better for most purposes, and provides better support. Bracing can be very short if your materials are naturally rigid... you just need to compensate for flexibility in the joint. More flexible materials require longer bracing. Well done lap or pocket joints can eliminate the need for additional bracing.
Don't forget to brace your project in two directions: front-to-back and side-to-side. A single brace in each direction may be enough, even if you have four or more legs.
Decide on materials that you'll be using, which may differ for different parts. Many factors influence materials chosen, including strength, desired appearance, and what you want to work with/pay for. What dimensions for lumber? You can count on a 2x6 for an 8 foot span, and a 2x4 for a 4 foot span. Properly balanced, a 2x4 can resist a huge compression load, but runs the risk of bending out from under it. Running close to the nominal loads you identified earlier is again an art form... when in doubt, overbuild! That goes for fasteners, too. You need to identify nuts, bolts, and screws in this step, too. I like hardenned (grade 5 or 8) nuts and bolts for load-bearing or stressed connections. A 3/8" grade 8 bolt will take almost any load a BDSM furniture design places on it, and the difference in cost is trivial.
How does your design break down (if it needs to)? The two basic options are disassemble and fold. Folding designs are faster and easier to set up and take down, but require a careful eye to strength. If your project disassembles, use nuts and bolts, not screws or lag bolts. Repeated threading into wood greatly weakens the structure over time.
One final consideration, relevant only to mechanical projects like The Fucking Machine: can you fix something if it breaks? If a motor burns out, you'll wish it wasn't sealed in a glued casing!
Draw the Plan
It's taken a while, but you're finally ready to draw a project plan. Sketch roughly at first, and revise your plan several times. Once you have a really good feel, draw a final plan carefully to scale (1:5, 1:10, etc) with a ruler and pencil. Explode tricky joints into detail.
Check some basic points. Will this design give me the positions I initiaqlly wanted? Can I access all of the interesting areas of my victim? Will it be prone to falling in any direction? How well does it meet my objectives, particularly the critical ones? Have I countered my contraints?
Next, draw each part individually, noting material and every dimension. Group parts made from the same material, and minimze waste by mapping them into purchasable units. For example, if you need 2 36" 2x4s and 3 24" 2x4s, you need to buy 2 8' (96") 2x4s at the hardware store. Allow for the width of the blade, as it will cut away 1/8 - 1/4" of material. Use the individual part drawings as you work, checking off parts you've already cut. Don't forget fasteners in the list you take to the hardware store.
To Prototype?
You may have a tough decision to make.. should you prototype your design? A prototype can be extremely valuable, particularly if you're not sure of parts of your design. Is that base wide enough to prevent tipping? Could a very tall person be secured to this? Where should that kneepad go? You may have questions that could be answered with a partial prototype, or one taped together from cardboard. If you're making a new design and plan to do it in expensive wood, a softwood prototype could save considerable heartache (and walletache).
You might create a scale prototype, using all of the specifics of your design in a (usually) half-sized model. This approach can uncover a myriad of problems without wasting nearly as much wood as a full-sized model.
Another option is a working prototype. I made a very ugly working prototype of The Fucking Machine, because I wasn't sure the drive mechanism would hold up. It did, and that prototype stayed in use for almost a year. None the less, that year of experience completely changed the design in version two.
From Design to Reality
Completing a design in detail is a good idea for many reasons. A full design ensures that you know all of the component parts, and can (hopefully, although it seldom works that way for me) make a single trip to the hardware store. You know exact sizes, and can lay them out to limit wasted scrap and avoid purchasing excess material. Finally, you have a better idea of what you're working towards, and more familiarity with the design because you've drawn it yourself a number of times.
That said, keep one point firmly in mind: there is a huge difference in practice between a) build to plan and b) build to fit. If you're exceptionally good, you might be able to build straight from plan and end up with exactly what you want. I'm not that good, I guess. I routinely build and assemble things a piece at a time, fitting the next piece straight to those already done. I change an entire design mid-stream because I picture something that might be better. I strongly recommend this approach.
Two examples:
This means that you don't mark holes on two pieces of wood by measuring, drill them separately, and put them together into a perfect fit. Instead, you clamp the two pieces in place and drill one hole through both of them. This approach ensures a fit as good as your alignment while clamping.
You don't look at your plan and say "the next piece needs to be 12" long." You measure it's location on the work-in-progress and find that it needs to be 11.95" long. You cut it a hair longer than that, just in case. You cut that hair's-width off, perhaps in a couple of passes, and end up with a perfect fit.
Bottom line: work the way that's most comfortable for you. Measure everything three times. Check squareness four. Remain flexible as you work, because your plan wasn't created by the almighty ;)