Breast press - how to make, tutorial


articles and tutorials BDSM workshop
A breast press is any device that compresses or crushes one or both tits. Many people have made these out of straight or fitted pieces of wood, metal pipe, and even PVC pipe. Every one that I've seen had either two or three tightenning bolts which, frankly, sucks. This project is a fitted wood design, and adds a much more effective closure mechanism. A few options are discussed at the end.
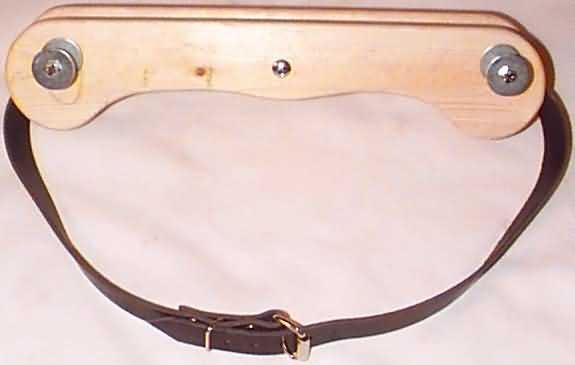
The picture above is a prototype in pine, by the way. My finished press will be oak. This one is fitted to me, because I was the only body available at design time. Despite the fact that I hardly have what can be called tits, it is still quite effective! Prototyping this project is smart, and you can copy your pattern to hardwood as we'll discuss.
If you're a male dominant, it is worthwhile to build a quick breast press to your own dimensions to experience first-hand what it feels like. I was surprised. It's not a pinching feeling... it feels like the meat is going to burst through your skin. All hardware can be reused for your final press, fitted to your SO or whoever... possibly even the torso strap.
Finalize Design
Let's take a look at the overall design and some more pictures of the prototype:
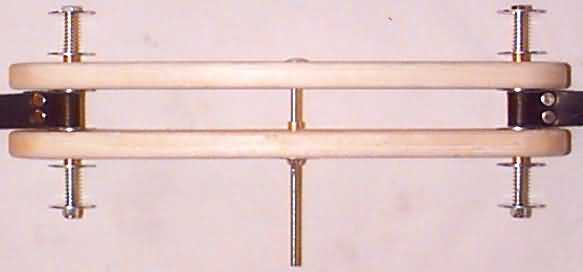
Of particular note in this design are the slide bolts, those on either end. Only the center bolt pulls the unit closed... the two slides stabilize it, keep it properly aligned, and provide attachment points for the torso belt. A closer look:
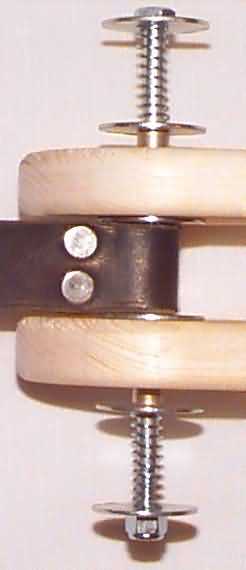
From top to bottom in the picture above, the following hardware rides on the 6" x 1/4" lag bolt: 1/4" fender washer, 5/16" spring, washer, bronze bushing, washer, belt, washer, bushing, washer, spring, washer, aircraft locknut. These springs do not provide the closing force. They are there to lessen the tendency of the breast boards to wedge diagonally as only one side closes down. The bushings used here are I.D. 1/4", O.D. 3/8", and 1" long. These will be cut down to 3/4" in the final piece. Holes directly through the breast boards will not work. Bushings are required for smooth action, and should be lubricated before first use. I also used one on the lower board for the center hole. This smooths operation, and is recommended but not required.
Note in the Top View diagram and picture on top of the page that the slides are farther forward than the closing bolt. This layout counterbalances the pressure of greater breast mass on the other side of the closing bolt.
Finding the Board Shape(s)
The critical design activity is to find the right shape for the breast boards. No dimensions have been listed above, because bodies vary greatly and shape/size will be very personal. The shape of these boards is particularly important for smaller-breasted occupant. A well-fitted shape can grab and crush the smallest of tits. Larger breasts can be crushed effectively with straight boards, although they too will benefit from a custom shape.
The press is improved if you use specificly shaped boards for both top and bottom of breasts. These two locations are usually shaped quite differently. Please see the section below on Making a Second Shape. If making only one shape, use the contours above the breasts.
You'll need a piece of sturdy cardboard, yardstick or measuring tape, scissors, and X-acto knife or similar. A sharp knife blade is a very good idea! The smoother these contours end up, the easier your work later. You also need your target body. Follow these steps, remembering that you can remove more cardboard but can't put it back:
- Measure the width of your target's torso, just above the breasts (between underarms). Cut cardboard to this length plus 8". Cut cardboard to final board width. I used 1x4 lumber (3.5" wide). You might want to go wider, but I recommend against narrower wood.
- Use a carpenter's square to mark the center along the cardboard's length. Also mark the edges of your torso measurement, equidistant from center. Finally, draw a line the length of the cardboard, 1 - 1.5" from the torso-side of the board. This will be the maximum depth of the recess, and it should be at least 2" from the front edge. See diagram, and draw the blue lines.
- Hold the cardboard gently in the position of the top press board. Mark an inital set of contours based on where the board contacts flesh, starting with about a 1/2" indent (much less than the final will be!). Cut out along these lines.
- Now it's time to iterate. Hold, mark, cut. Repeat as necessary. You might want to go across the end lines to get the right fit, but respect the depth line. Try to keep both sides mirror images, although we're only going to use the better side.
- Once you have the recess cut to a nice body fit, finish the outline. First, round the inside corners, tagged "A" in the diagram above, to the body-edge of the cardboard. Next, use a compass to scribe a circle from where the shape meets the body edge to the front side. This radius will be 1/2 the board width. Press hard enough to leave a distinct mark at the center of this circle. Cut these lines to get the final shape.
- Pick the better half of your cardboard template and shape it carefully. Cut cardboard along center line and disgard the lesser half. Using only half of the model ensures a mirrored final board. (NOTE: if making top/bottow shapes, read that section before completing this step!)
You now have the shape and size of the press boards identified. Mark bolt holes as follows. The center bolt goes 3/4" from the body-side on the center line (now the edge of your template). The slide bolts go 3/4" from the front of the template on a line square to the front edge and running through the radius center marked above. Place a notch and hole respectively in these locations.
Remainder of Design
How widely should your press open? Generally, 3" is sufficient. If you target has particularly large and firm breasts, you may want extra clearance. The prototype pictured has about 3.25" of clearnce at maximum openning. This requires 6" bolts, as the openning is limited by the washers and minimum compressed thickness of the springs. Select bolts and springs based on your desired openning. The springs don't have to be very strong, and stronger springs make the piece harder to use.
Construction
Construction itself is quite simple, since you only need to work with two pieces of wood. Start by cutting your stock to length, which is twice the template length plus an inch of waste. Mark the center line of these boards, much as you did with the cardboard earlier. Trace the template shape onto both sides of the center line. Also, mark the bolt holes through your template.
Cut the shape into both boards with a jig, scroll, or band saw, staying about 1/8" to the outside of your lines. Pick a board and carefully sand this down to the line with a drum sander. If you don't have a router, do the same thing for the second board. If your drum sander is tall enough, you can do both boards simultaneously to ensure identicality. If you have a router, use it to copy the final shape of board 1 to board 2 with a laminate trimmer bit.
Clamp the boards together and drill the bolt holes. These should be truly square in all directions, and are best done on a drill press. The slide holes should be drilled with a bit the diameter of your bushing O.D. Mine was 3/8". Drill the center hole to 1/4". Unclamp, and drill out the center hole in one board to the bushing O.D., if you're using a bushing in this location.
One one board, cut a recess to receive the square portion of the carriare bolt. Do this using a chisel, and leave a tight fit.
Route or sand all outer edges of both boards to a curved profile. I used a 1/4" quarter-round router bit. Sand everything. Finish boards at this time, as desired. Put the bushings into their respective holes. This should require a mallet... don't use a metal hammer as it will distort the bronze! If this is all you have, place a block of wood over the bushing to knock it into place. Should the bushings slide easily, use wood glue (although it won't stick well to the bronze, it will fatten the wood grain enough to secure them by friction).
Assemble the press as shown. The assembled press is required to measure for the belt.
Torso Belt
The torso belt requires very basic leatherworking. For techniques, please see the Buckling Restraints project. The prototype uses a 1" torso strap. However, you might want a wider belt that narrows to 1" going into the press. Without this narrowing, maximum closure will be limited to the strap width. Here's how to measure things:
- Hold the assembled press tightly in location. Use a measuring tape to identify the distance behind the torso from one slide bolt to the other.
- Halve this distance to get the buckle strap length. Cut a 1" strip of leather to this length plus 5" (2" for slide bolt loop, 3" for buckle).
- Secure the slide bolt loop using two rivets. Attach the buckle to the other end.
- Lay this buckle strap on the floor. Slide a 1" strip of leather into the buckle, and adjust to total strap length plus 6" (2" for slide bolt loop, 4" for belt tongue). Cut the belt hole strap to this length.
- Make a slide bolt loop in this strap, as above. Finish the belt end, with a hole at the measured location and at least one more on each side, 1/2" shorter and longer. Alternately, you can place this hole using your target occupant.
- Disassemble the press and reassemble with belt in place.
You are done.
Making a Second Shape
As discussed above, a press can be made more effective with distinct top and bottom press boards. This adaptation starts in the design step Finding the Board Shape. After finishing the top board template but before cutting it in half, copy the outside semicircles to a second piece of cardboard of the same width. Using this second template blank, shape out a recess to match the torso below the breasts.
While making this recess, it's important that the fronts of both tempates protrude from the torso to the same distance (note, not by the same amount!). You'll have to eyeball it to make this determination. See diagram, in which the dark lines are the templates. Of course, every body is different.
After completing both templates, cut them in half as described above. Use each template for their respective boards.
Possible Additions
There are a couple of ways to make the breast press more severe/interesting. You could place small, dull points on the pressing surfaces, but be careful. Even dull points could easily be driven through the skin given the forces involved.
A safer alternative is to drill a number of holes into the pressing surfaces. 1/4" or so is about right. You can round the edges inside the holes, or simply de-splinter them. If drilled all the way through, you can poke the stretched flesh with needles, etc.
Finally, note that severity can be increased by limiting the amount of rounding on the body-side pressing edges. This is a different type of sensation, however, and may not be as interesting as the crushing/skin-splitting feeling.