Canes - BDSM furniture Workshop


articles and tutorials BDSM workshop
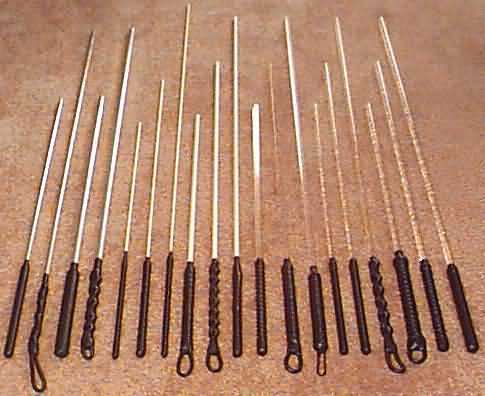
Canes are among the simplest of toys to make. In fact, you could pick up a broomstick and call it a cane. This project is only slightly more complex. Here, I'm talking about acrylic, aluminum, and fiberglass. The techniques could certainly be extended to any other suitable material. The picture above shows a batch of 19 canes in these materials. I made these for a total cost of about $25.
Difficulty: Low
Overview
The cane-making process is quite simple. Select a good material, cut a piece to length, finish the business end, and put a handle on it. We'll look at a basic handle process with a couple of options. Length is a matter of preference, but generally between 18 and 40 inches. I mentioned a few materials above. Many other types of canes are possible, of course, including: carbon fiber, coaxial cable, rattan, braided thin rattan/willow/fiber optic cable, steel rod, and steel pipe.
Finishing
The two finishing concerns are the contact surfaces (sides along the cane's length) and the tip. The contact surfaces are best sanded by hand, if it's necessary in your material, using descending grades of paper down to about 400 grit. In metals, you may want to finish by polishing and coat with clear acrylic. Acrylic and fiberglass rod should come with smooth surfaces.
You'll probably want a rounded tip. In these materials, it's a simple task. Rough out a rounded shape with a medium-fine metal file. You can sand a final rounded tip by hand, of put the cane in a drill press at lowest setting and file/sand while it spins. Aluminum and arcylic can be polished to a very nice finish, if desired.
Handle
The unfinished end of your cane stock should be cut square to length and free of protrubances, but doesn't need any additional preparation. This is where the handle is going. The basic handle process, in order, is: electrical tape or shrink tubing base, texturing wrap, shrink tubing, and tool dip. The first (base) layer gives the texturing wrap something to sink into, and helps lock it in place. Texturing wrap itself gives the handle additional thickness and a gripable form. Shrink tubing is very durable and provides excellent clamping force to secure the handle. Tool dip provides a smooth, complete, water/chemical-resistant exterior, and can also cover minor imperfections.
The batch of canes pictured above include five distinct handle styles, each using the basic process described above with different texturing wraps. Here they are, with reference numbers:
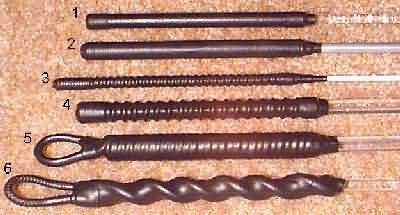
1. Tight twine wrap. This handle is wrapped with a single layer of cotton twine (like kite string), tightly spaced along the handle surface. It doesn't have much texture, nor does it add significant diameter or weight.
2. Tight wire wrap. Tightly-spaced wrapping with 16-gauge wire. I used brass wire, because it was handy and easier to wrap than steel. This approach also adds only a bit of texture and diameter. A big advantage: it adds a lot of weight to the butt end of the cane, and nicely counterbalances a long and/or heavy cane stock like the 1/4" aluminum shown here.
3/4. Loose wire wrap. These two have a loose wrapping of the same 16-gauge brass wire. This is my favorite handle style, and provides a nice combination of texture and weight.
5. Tight rope wrap. Another tight wrap, this time in 1/8" full braid poly rope. If you like a thicker handle, this is a good approach. The hanging loop is optional in this and all other wraps.
6. Loose rope wrap. This one uses the same 1/8" rope, but in a loose spiral wrap. Very heavy texturing makes this an easy handle to hold.
It's also possible to combine wraps, particularly rope and wire. This approach yields a number of good characteristics: weight, diameter, and texture. It is, however, more work.
Texture wrapping takes a little practice, and your handles are likely to get much better after four or five practice runs. Use electrical tape to hold wrap in place, both temporarily and permanently. Using a loose wrap (one of the more challenging) as an example, here's the process I follow.
First, in rope with a loop. If you want a hanging loop on the butt end, you have to start from this location. Start with about 3' of rope (this will be too much for a 6" loose wrap handle, but rope is cheap and coming up short sucks). After a few handles, I started putting about 2" of shrink tubing in the center of the rope, smoothing over the loop segment for aesthethics and rigidity. Lay the loop in place over the butt of the cane, ensuring that the two lead ropes are 180-degrees apart and slanting in the direction of twist, and secure with tightly wound electrical tape. Wind the two rope ends up the shaft past the end of handle and temporarily tape in place. Even the wrap out in the handle area. Tightly tape just short of the top of handle location. Cut off excess rope above this point and remove. Use a lighter or candle to melt the rope, and push it down with your finger while still hot. Apply shrink tubing and tool dip.
Second, in wire without a loop. Start with enough wire, which will be more than you think. Tape isn't enough to hold the start in place, since you have to tug hard to wrap snugly. Wind the starting end around something secure (I use a clamp), perpendicular to a location at the upper end of the handle. Wind 3 or 4 tight wraps to start, then wind loosely maintaining an even spacing between wraps. Finish with a few tight wraps, leaving about 1/8" of bare handle at the very butt. Snip both ends of the wire close to the outermost wraps and bend the ends in with pliers. Even out the loose wraps as much as possible before finishing the handle.
Final Thoughts
Shrink tubing. Look for 3 or 4 foot lengths at an electronics store (not Radio Shack... Fry's is good if there is one nearby). When cutting to length, leave extra and cut it off after shrinking. Heavy textures like loose rope wrap pull some tubing length into the grooves, and can contract the tube by an inch or more. Start shrinking at the top (tip-end) of the handle and work towards the butt. If your tubing comes folded flat or nearly so, crease it three more times creating an octagonal cross-section before shrinking. Failing to do so leaves bunched up imperfections in the final shrink. Shrink tubing goes down to about half it's original diameter. Use as thin a size as you can fit over the handle... you can even lubricate to slide on if necessary (I use a motorcycle chain lubricant, ChainLube). I shrink with heat from a candle.
Tool dip. Try the aerosol version. It works much better than I expected, and goes on faster than traditional dipping. Use masking tape _just_ above the top of handle to eliminate overspray. Turn continuously during application, and apply until it almost drips.
Drying rack. A simple drying rack for a batch of canes is a secure length of 2x4 (wide side vertical) and a handful of rubber bands. After spraying a cane, loop the center of a rubber band around the cane 6" from tip. Pull rubber band ends around 2x4 and loop over tip of cane.
Clamping blocks. Rods aren't the easiest thing to clamp in place, and you need to hold cane stock securely for wrapping. Make simple clamping blocks by routing or carving appropriately sized triangular grooves in softwood blocks. My blocks have three grooves, sized for 1/8", 1/4", and 3/8" canes. 1/4" square stock fits nicely in the groove sized to 1/4" round stock. Two pairs of blocks make a good cutting jig, especially for fiberglass which is prone to splitting.
Excess heat. When shrinking tubing over acrylic, watch out for excess heat! Heat it enough and your cane stock will turn into spaghetti (yes, I speak from experience). This is especially problematic with wire wrap, since the wire conducts and retains heat well. Shrink fast or with cooling breaks. Also, make sure the tubing cools completely before you touch it, unless you're looking to sign the cane with your fingerprint.
Happy cane making!