Copper-handled Floggers - BDSM furniture Workshop


articles and tutorials BDSM workshop
I supposed every crafter has their favorite way to make flogger handles. This may be mine. These handles are fast, easy, strong, and cheap. If you're willing to do a little extra polishing work, they can also be quite beautiful. In this project, we'll cover the basic approach, two methods of attaching fall, and a few other tidbits.
Difficulty: Low
The Basic Handle
Components
The main handle body is standard copper water pipe, available for a buck or two per foot depending on how much you buy. I like my handles 7" long, but they could be any length. Select 3/4" or 1" pipe (the latter if you have larger hands). When cutting, look for a section without stamped markings... although these can be filed out, it's extra work.
The butt-end is a typical end cap in the pipe diameter you selected. These fit snugly over the end of a piece of pipe. One of the attachment methods below (bungee flogger) uses a bell reducer, a joining connecter intended to change between pipe diameters. These are described by from-pipe diameter and to-pipe diameter. For example, for 1" pipe you can get 1"-to-3/4" and 1"-to-1/2" bell reducers.
Handles are assembled like this:
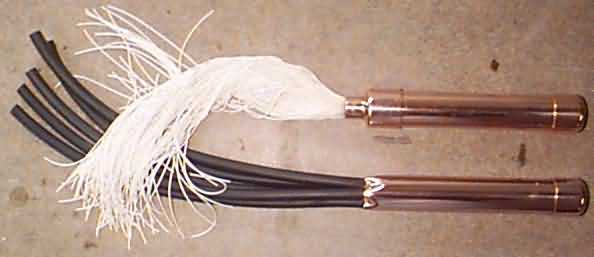
Fall attach to the right end in the diagram above. The two example floggers that follow illustrate two possible attachment methods.
Shock Cord Flogger
Attachment method one uses a combination of pressure and peening (smacking with a hammer to distort the pipe) to lock the fall in place.
The first example uses dense neoprene shock cord, basically a 3/8" cylinder of neoprene rubber. Each piece needs to be 3" longer than the eventual fall length, and you also need an extra 2" piece. My example has 5 12" fall, and therefore used 5 * (12 + 3) + 2 = 77" of cord.
The first attachment method is appropriate for thick materials that are at least somewhat compressable (thick rubber strands, leather). No bell reducer is used in this design. The diameter of pipe and fall material will determine how many fall are used. Look for a snug but not tight fit. Using 3/8" shock cord and 1" pipe, 5 fall are appropriate. The shock cord makes an ideal material for the "lock", which will be forced in with the fall as the inital pressure attachment. Narrow one end of the lock as shown below.
Because in this design the fall may rest directly against a home-cut edge of pipe, it's a good idea to smooth the fall-end of the handle body inside and out. Use a metal file and/or sandpaper.
Attaching the fall is a four-step process:
1. Line up the ends of all fall in the pattern shown. Insert the lock in the center of this pattern, about 3" from the end going in the pipe.
2. Work the ends of the fall into the pipe. This should be easy until you reach the lock. Work them as far in as possible, then tap with a hammer until the lock is slightly below the end of the pipe.
3. Peen the areas shown until they are snug to the fall. To get a smooth bend, hold a 1/4" bolt against the pipe at a slight angle and hit the bolt. See below.
Bungee Flogger
Attachment method two also uses pressure, but this time it's augmented by a retainer too wide to fit through the entry hole. This method is appropriate for thin, flexible fall that can be bent tightly, including bungee, leather lacing, fishing line, and pull-chain. Here, it is illustrated with a bungee flogger.
This flogger uses "bungee rubber," very thin strands of rubber easily obtained from the core of a typical bungee cord (which can be bought in bulk, BTW). The handle includes a bell reducer (mentioned above) from 1"-to-3/4". Determine the number of fall based on a tight (note that tight is "tighter" than snug ;) fit in the reducer, in this case about six times the bungee core.
You'll want to leave about 1" per fall inside the handle, and have an extra inch for trimming-to-length. My 10" fall, 6 times core, was made with 6 feet of bungee. Ideally, this will be bought in bulk. If you must use individual finished cords, look for some at least 2 * (fall + 2)... my flogger would have needed 3 bungees 24" long.
You also need a retainer. Mine is simply a washer. The retainer must be small enough to fit entirely inside the handle pipe. It must also have a hole, although this doesn't have to be large. Finally, get a length of strong wire (14 gauge or so) roughly six inches long.
Carefully remove the woven sheathing from the bungee material. I've found a seam ripper (from a sewing store) perfect for this task. To avoid a huge tangle, leave about 1/2" of sheath intact at each end and a couple times in between. During this process, it's inevitable that you'll snip an individual cord or two. Ignore them for now. If using a single length, fold the core into a three-thickness bundle. If using individual bungees, lay the three cores together for the same result.
The remaining assembly has three steps:
1. Wrap the wire tightly around the bundle at its center, at least twice. If you left bits of sheathing intact, remove them now. Bring the wire ends together. Double-over the bundle, bringing six thicknesses together.
2. Use the wire to pull the end of the bundle through the small end of the bell reducer. Pull through only a couple of inches.
3. Use the wire to attach the bundle to the washer, loping it through at least twice. Wind the remaining wire in any manner desired. Tug the fall to bring the washer against the inside of the bell reducer.
The following diagram is a cut-out view of the finished attachment:

Slide the handle body into the large end of the bell reducer. This needs to be a secure connection. You can braze, glue, or friction fit the pipe into the reducer. The latter is the fastest... simply distort the pipe end slightly by tapping from a few angles with a hammer until it is very difficult (but possible) to insert. One advantage if this approach is that you can remove it again, if necessary. The same approaches can be used to fit the end cap on either design.
If you used one length of bungee, you have loops... cut them open at the tips. Trim all fall to the same length. If you accidentally cut through individual cords while stripping the bungee sheathing and have a few very short fall, stretch them out from the handle a bit and cut. The resulting end will disappear into the reducer. Strip apart any bungee strands that may be stuck together.
Finishing Touches
If your fall are heavy (as is the case with the shock cord flogger above), you might want to counterweigh the handle. I did this with a few ounces of silicone rubber caulk and a handful of nails. Tap the butt end several times on a hard surface to seat the filler at this end, and hang by fall to cure.
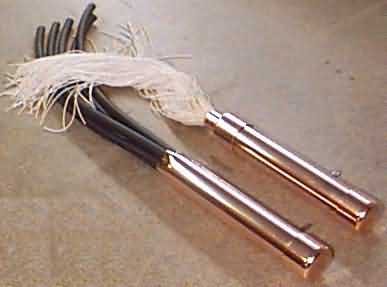
I did about 15 minutes of polishing (each) to get the near-mirror finish on these two floggers. You'll need two buffing wheels, a drill, a rag, and three grades of compound - rubbing compound, polishing compound, and chrome polishing compound (i.e. Simichrome). Dedicate one wheel to each compound, and remember which is which! Rubbing compound does the heavy work, stripping off the dull protective coating and ink markings. It will also smooth the edges of bigger imperfections, such as stamped writing. If you want to eliminate these, file out then sand with 400 and 600-grit sandpaper intended for metal. Polishing compound with a drill-driven buffing wheel gets a 90% finish, smoothing out the fine scratches left by rubbing compound. Use a rag with the chrome polish as the final step. Polishes like Simichrome and Brasso include tarnish inhibitors. You can actually make an effective mirror with this process.