St. Andrews Cross Accessories - BDSM furniture Workshop


articles and tutorials BDSM workshop
Accessories
Attachment Points
Obviously, the cross needs attachment points if you plan to tie anyone to it. Put in as many or as few as you'd like, using screw-eyes of appropriate strength. If you plan to partially suspend someone's weight, usually from the wrists at the top of the cross, put eyebolts through the board in relevant locations. Some likely attachment approaches:
Handles and Platforms
Handles at the top of the cross can be useful, allowing an occupant to shift around more easily. Ideally, handles will: a) lock securely in place, b) accomodate load of 300# of so, c) adjust up and down the body leg, and d) be useful in both face-in and face-out positions. The simplest handle is a 1.5" dowel permanently attached to the leg, if you can do without (c).
Platforms are a place for feet to rest at the base of the cross, attached to the bottom cross legs. They provide a more helpless feeling since the occupant isn't on the ground, and allow some adjustment of ass height, etc. While they could be permanently attached, moveable platforms are more flexible. Ideal capabilities include all of tose listed for handles, but they should accomodate a 1000# load. As with handles, you can permanently attach a platform to your cross.
Hardwoods and metal are excellent material choices for these accessories. Softwood pieces that can withstand this level of force will be bulky and less attractive (though potentially functional). I prefer 1" oak stock and/or steel.
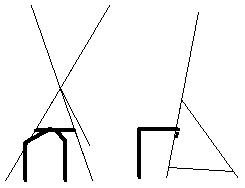
The load requirements, especially for platforms, elimiate friction as the holding force.. you can't clamp on handles and platforms, IMO. Modify the body boards to hold these accessories securely in place. Simple options for this are depicted here:
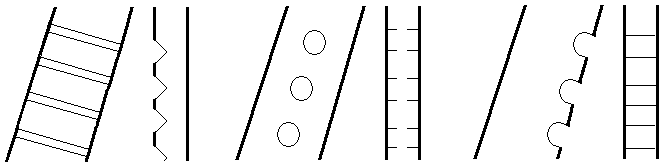
The surface grooves pictured at left are particularly nice, since they can be cut into the back of the cross and leave the front smooth and sleek. Cutting them is a bit more difficult, and requires a table saw with dado blade. The accessories themselves are also tricky to design well. The side grooves (right in diagram) are easier to make... drill hole, cut open to side. The easiest and perhaps most versatile design above is simply holes down the middle of the board. Of course, notches or holes only need to go within the useful range of the attachement... don't drill holes over the entire length of the body beams!
Handles and platforms are subject to three forces. The downward force is strongest, representing the majority of weight bourne, and works to slide the accessory along the board (detachable/moveable types only). Rotational force is a factor in the holes-down-the-middle design. Any off-center force will try to turn the accessory around center of the hole. Extraction force occurs only if an occupant tries to pull the accessory away from the cross face. In the holes-down-the-middle design, pin(s) on the accessories slide into hole(s) to provide support against sliding along the board (they bear the weight). We'll assume this approach in presenting sample handle and platform designs, which will illustrate different approaches to rotational and extraction forces.
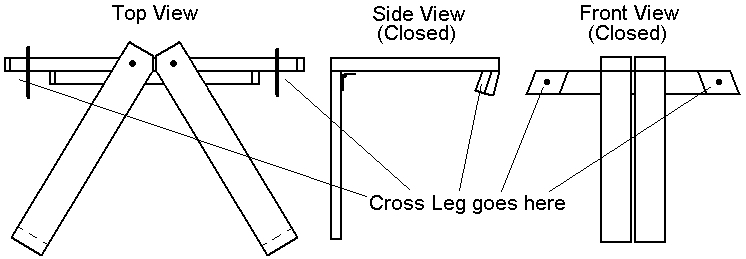
First a handle design. As discussed, handles have lower load requirements than platforms. In the sample design, a 1.5" or 2" dowel is the "pin". Obviously, holes of matching size must be drilled into the upper cross body. While the handle itself (another length of dowel) in this design runs parallel to the cross body, perpendicular handles are equally effective.
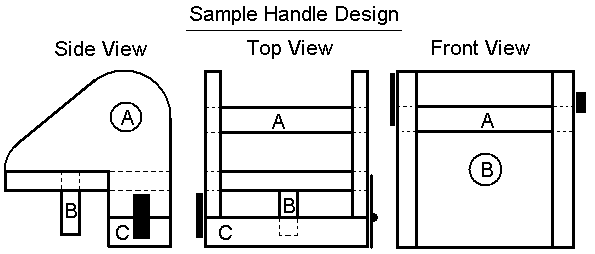
In each view, A is the dowel handle, B is the dowel pin, and C is a crosspiece that closes behind the beam. This crosspiece is hinged at one end and secured by a tension latch at the other (black box in side view), and prevents accidental extraction. Note that the sides of this part (facing in side view) hang over the sides of the beam, preventing rotation.
The platform design will present a slightly different approach, a very simple one. Because of the load requirements, This platform will use a steel pin - a 1/2" bolt. This obviously requires 1/2" holes in the lower legs of the cross body.
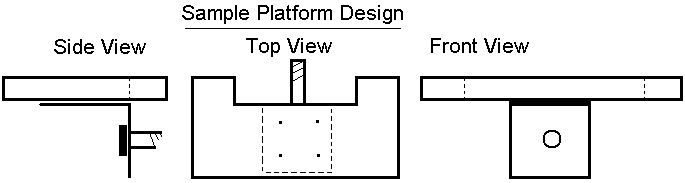
This very simple design has only three components. The platform itself is a piece of wood shaped to fit snugly around the front of a cross leg. It is supported only by a very heavy L-bracket. These two pieces are bolted together, and to the leg using the 1/2" bolt mentioned above. It's a good idea to limit the depth of the platform and thus the leverage exerted against the bracket. Adding one or two triangular braces beneath the platform so they rest against the leg would limit flex and strengthen the overall design.
It is possible to ignore rotational forces in a platform design, creating a "floating platform" that changes angle. There can only be a single pin, of course, and it muist be above the platform itself. However, if you try this consider limiting the amount of rotation to prevent the platform from flipping.
Butterfly Chair
A couple of people have put butterfly chairs on their cross.. removable ones, of course! Particlarly if you have a small space, doing so extends the capabilities of this piece.
Basically, a buterfly chair is a seat with legs that can open and close, similar to a butterfly's wings. The design shown here bolts to the lower cross leg, and uses the cross body as the "back" of the chair. Look through the diagrams below.