Frames - BDSM furniture Workshop


articles and tutorials BDSM workshop
I loosely define a "frame" as any free-standing (or nearly so) structure from which you can suspend someone. This project will talk in general about frames, point out some key design concerns, and outline a couple of designs in more detail. Most frames will be made primarily from structural lumber, and definitely qualify as large pieces. Using metal can give spectacular results. In designing one, carefully balance portability with strength. If you have the option of suspending someone from your ceiling, that is generally a more practical option.
Difficulty: Moderate to High
General Types of Frame
The first design consideration is the best type of frame to meet your needs. There are probably a dozen different configurations that accomplish the two goals listed above (free-standing and suspension-capable), each with advantages and disadvantages. A few of the more common are pictured and described below.
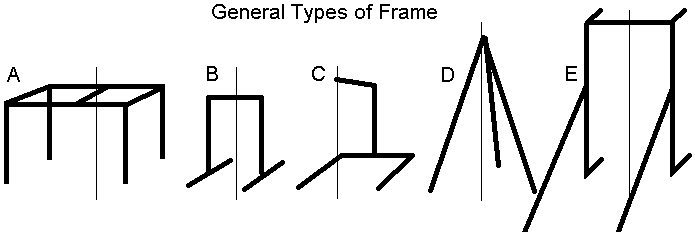
A - Box style. Similar to a very high table, the box frame has four legs and forms a cube or rectangular box. It can be an extremely sturdy design and is relatively easy to make, but uses a lot of lumber and space. Access to the suspendee is limited by the four legs. Rates high on flexibility, since you can tie people in a myriad of suspended, standing, and floor positions.
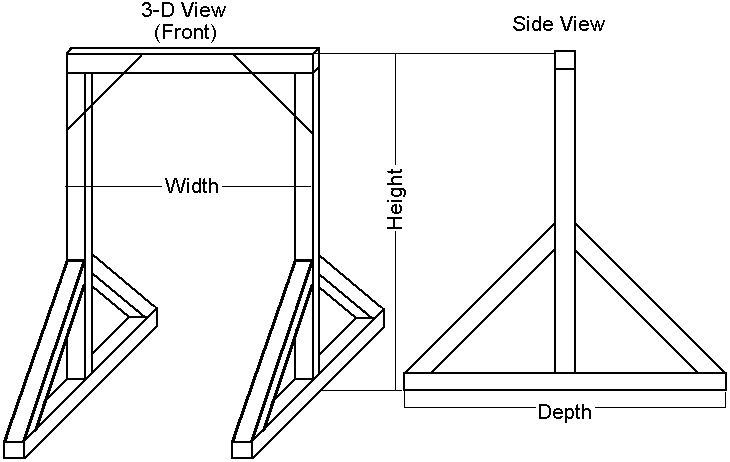
B - Gallows style. The gallows frame is an upside-down U with legs. It is relatively easy to build, and uses much less material than the box style. Footprint is smaller, and access improved as there are only two legs.
C - Single-arm style. The single-arm frame provides excellent access to the suspendee, nearly 360 degrees. It is, however, much more difficult to design and build since stress on the single upright and arm are huge. This is a good design if working in metal, but less practical in wood.
D - Tepee style. The tepee frame isn't practical in most home situations, since total height needs to be roughly twice that of other styles. The one advantage of this design is that it can be built quickly in a backwoods setting, assuming long poles can be found or brought and rope is available.
E - Wall gallows style. The wall gallows frame leans against a building wall. Mine is 12' high and tailored to the entryway of my current domicile. This design is the most practical way to build a very tall frame, as it limits material requirements while providing excellent stability.
Design Considerations
Before you start designing, look at your available space. You need not only enough to place the frame but to swing a whip (or whatever you like to do to hanging victims). Some frame types have a smaller footprint than others, and if space is limited lean towards the gallows style.
How high? This is a critical question. Understand what you're going to do with the frame first. You may be able to suspend someone from a 7-foot frame, but not with a chain hoist (which typically takes up at least a foot). Wrist suspension addes the length of the victims arm into the equation. Neat toys like my hanging strap cage may take much more clearance to lift (that item requires at least 12 feet). Ask similar questions about width. If you want to suspend someone in a cage, how wide is that cage?
Frames are 1) very large 2) very tall and 3) used for suspension. Each of these characteristics makes design a bit more critical.
Very Large. Your piece almost certainly needs to disassemble, if only to get it from workspace to playspace and take it with you should you move. I actually talked to someone who glued a piece together and later discovered that it wouldn't fit through the woodshop door. It happens. Carefully think through how your piece breaks down, as it will be weaker than a permanently assembled equivalent. Identify your longest part and ensure that it can turn the corners of your house and fit in your SUV. How strong do your fasteners need to be to support the huge loads of safe suspension? Bolt, don't screw, where the piece breaks apart.
Very Tall. Tall things need wider bases. This is especially true in suspension, which moves the effective center of gravity upwards. Frankly, the base of my box frame is too narrow.. a swinging suspendee does have a chance to knock it over. I broke the "base at least half the height" rule, and now regret it.
Used for Suspension. Suspension of any kind automatically raises the bar on strength and stability. It increases the consequences of failure. As a result, you should design extra strong and extra sturdy. Sway in any direction increases the forces on your piece, so brace heavily. Use a 10x multiplier for force tolerances. Finally, think about where you're going to use your frame. Make sure the floor beneath it is sound, and distribute weight across the floor effectively. You don't want to visit the basement unexpectedly during a first-floor session.
Map the stresses in every part of your design, and make sure they're covered. Pay particular attention to the suspension point itself, which takes the greatest load. Consider buying a 2-ton chain hoist for the actual lifting. If you do, make sure it fits into your eyebolt! If you'd rather use rope, you might want to permanently attach a heavy pulley to the suspension point. Use a cast eyebolt (available in ton+ load ratings) or a 5/8" steel eyebolt professionally welded shut. Even this heavy steel stock can bend open.
Frame Designs
Box Frames
A box frame is a good choice for a first frame, if you have the space. It is a very versatile piece of dugeon furniture. I've often used mine with a mattress in similar fashion to a bed with good tie-points. The basic design is something like this, taken from my own box frame:
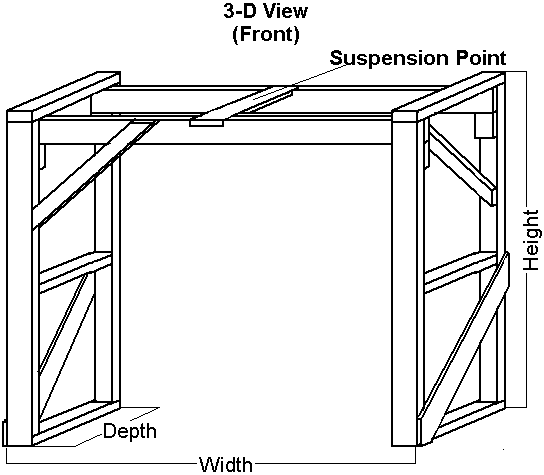
This design includes center bars at each end. They aren't necessary for stability, but I thought it might be interesting to sit someone atop one and tie them there. I haven't ever done so, so perhaps not ;). If you plan to do this, rabbit these beams into the uprights by 1/4 - 1/2".
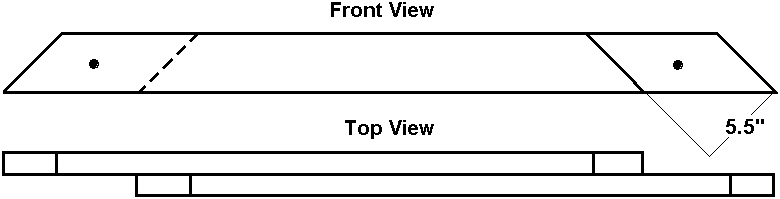
It's very simple construction. Everything except the braces is made from 2x6 structural lumber. This is good for a span (width) of at least 8 feet. The crossbeams rest on 5.5x5.5" blocks screwed and glued to the uprights. I didn't want to weaken the uprights by notching these boards in. Each vertical end is a unit, and stays assembled at all times. Upper braces and all three crossbeams can come off. The only parts that are even a little tricky are the upper braces, made from two pieces of 2x4 glued/screwed together and diagramed below.
Note in the overview diagram that this frame is braced twice in each direction. As discussed in the design considerations, work hard to eliminate sway in your frame.
The parts that come off are generally secured with bolts. One exception is the center brace (which holds the main suspension point). It friction-fits into slots in the two crossbeams as diagramed. There's no need to weaken this area with holes, since primary force is downward. Fasteners go on as follows:
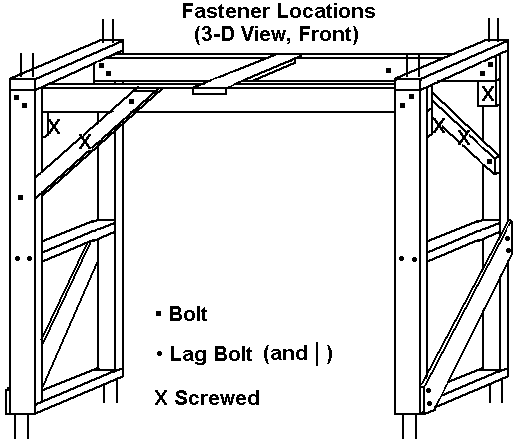
Putting it together and taking it apart is a bit of work. Eight bolts for the crossbeams and four more for the upper braces. Because the parts are large, a helper makes things much easier.
Gallows Frames
I haven't built a gallows frame yet because I don't have room for another frame. However, it is one of my favorite designs due to its simplicity. The diagram below showns one I will build some day soon. I intend to use 4x4 lumber throughout, and should end up with a rock-solid piece. This is similar in construction to a polished steel gallows frame at the Power Exchange in San Francisco, a beautiful piece of work.
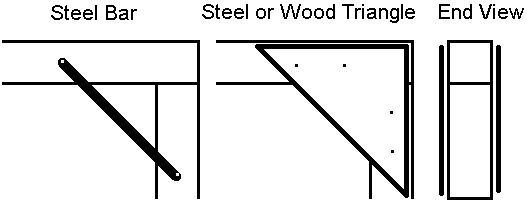
The lower bracing is at 45 degrees on both ends. The upper ends of these braces bolt to the uprights through a common hole, allowing easy removal of the 3-piece bottom units from their respective uprights. Use a 1" or 1.5" dowel to pin the upright into the horizontal leg, as described in the Kneeling Post design.
Note that the crossbeam (which holds the suspension point) rests entirely atop the upright for good load transfer. These can also be pinned with a dowel, or bolted using a metal plate.
There are a number of choices for the two (preferably four, one on each side of each joint as shown in end view) upper braces. My preference is heavy steel bar, but 2x4, triangular steel plate, and triangular wood sheet are also options. Using steel bar, you could permanently attach these braces to the uprights, leaving them a bit loose to swing. Fewer parts to carry while avoiding sharp corners sticking out.
Wall Gallows Frames
For very high frames, over about ten feet, no design beats a wall gallows frame if you have a place to set it up. Mine is 16 feet high, and built specifically to the entryway in my current domicile. It's very stable, resting against the wall on one side and braced against stairs on the other.
The overview diagram below should give a good idea about the design of this frame. Note that it's not quite to scale. The four boards sticking back (in the front view) are actually only 2 feet long. This seriously breaks the base width rule on a 12-foot height, but is very stable because the wall becomes part of the construct. The wall gallows has a very small footprint for its height.
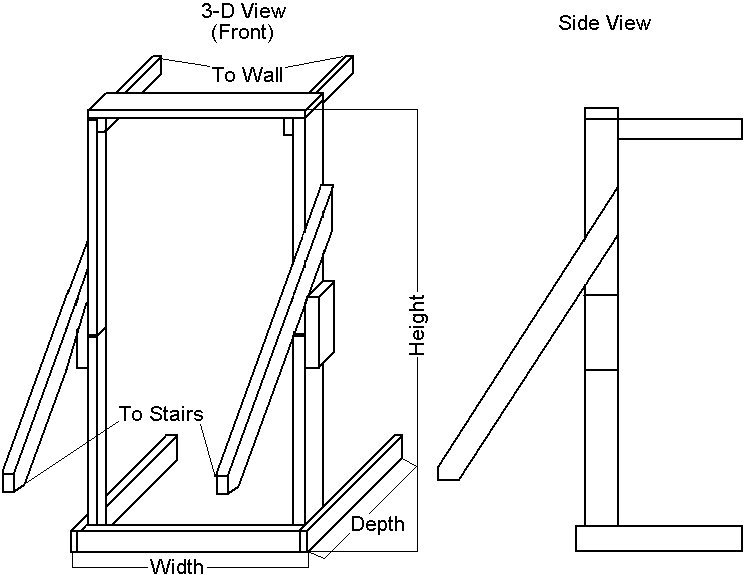
This design is almost entirely 2x6 structural lumber. The upper wall braces, upper angle braces, and stair braces are 2x4. The uprights are two eight-foot pieces, butt-jointed and braces with short lengths of 2x6. These can be unbolted from each other. The U-shaped base stays in one piece, but unbolts from the uprights. The top half remains together, and is the most unwieldly piece. I've covered board ends that butt against the wall with carpet to protect my home. Look at the diagram below to clarify assembly and fastener types/locations.
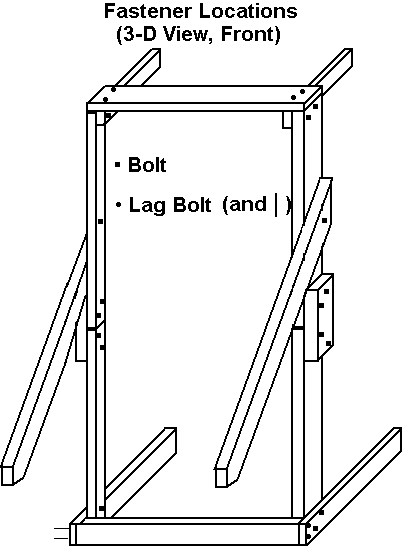
Note that this design breaks another rule. The top crosspiece lies across its height (6") rather than its width (2"). I accept this compromise because the distance is relatively short, just under 4 feet, and I doubled it (2 boards) just to be safe. It has held considerable loads (myself and my partner) without sign of failure.