Basic Horse - BDSM furniture Workshop


articles and tutorials BDSM workshop
Perhaps the most common dedicated piece of dungeon furniture is the horse. Modeled in many respects on the carpenter's horse, a BDSM horse is fairly flexible, and can be made more so with a couple little tweaks. The basic horse ideas here will be expanded in a "better" horse design at a later date.
Difficulty: Easy
Special Tools and Materials
Squangle or protractor
Finalize Design
As diagramed below, the basic horse is very easy to make. The project does require a large number of angled cuts, and is best done using a miter saw.
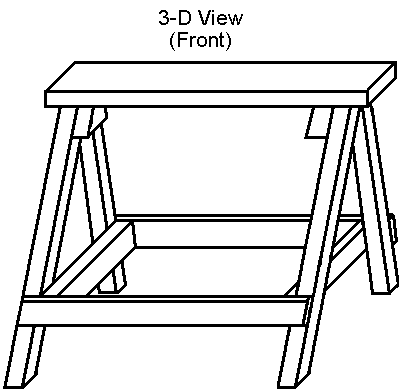
The top is 2x6, and everything else is 2x4. The result is sturdy, even though there aren't any angled braces. If you want a piece that disassembles, I'd suggest planning to remove the top and two side boards from the (roughly) triangular ends.
Identify the best height for your purposes. Don't forget to include padding, if planned, in this decision. Two inputs are the natural height of a primary partner's belly/chest when bent over, legs spread, and the top's favorite target height.
Use this height (and some right triangle math, described on the techniques page) to determine the width for your design. For this calculation, we'll assume a leg angle of 71 degrees, about typical. You may want to change this angle.. making it smaller results in a wide base and more stability. We'll find the width using an imaginary right triangle:
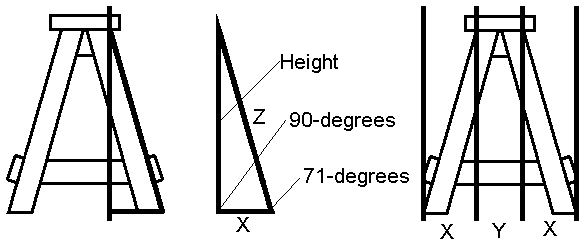
2 - Select your angle. Change the recommended 71 degrees if desired.
3 - Calculate partial base width, X in the diagram. The calculation is [base segment] = [height] / TAN([angle]). For a height of 32" and 71 degree angle: 32 / TAN(71) = 24.25
4 - Calculate total base width. This is twice the segment found in step 3 plus the distance Y in the diagram.
While you're doing math, calculate the actual length of the leg, indicated by Z. Since we have the base segment, it's easy math: square root of (height squared + base segment squared). Continuing the example, this one is root(32*32 + 24.25*24.25) = 40.15. Since you probably don't want to cut your legs to a difficult fraction, round it. This will change the final height by a trivial amount.
Note that you can use similar processes to work backwards from any particular dimensions. For example, if your planned storage place is only 23 inches wide, you could discover that the height will be about 26.75 is you stay with a 71 degree leg angle. Or that an angle of 74 degrees hits the 32" height you started with.
Finally, what's the best length for you? If the horse will be used in a straddled, lying down position, length should be about three feet. Another favorite position in bent over the length of the horse with wrists and ankles secured to the legs. Length should be comfortable in this position, if planned.
Ends
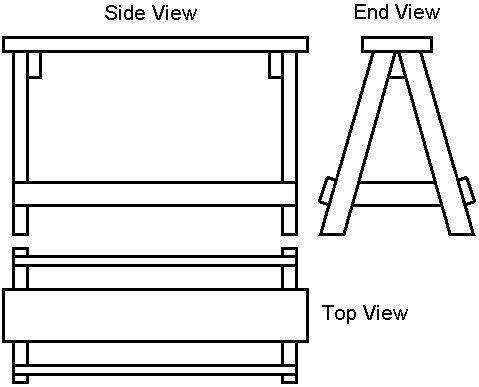
Start construction with the two, identical triangular ends. Each is made from four lengths of 2x4, and constructed as shown. The view in middle position is from _inside_ the horse (cross braces facing you).
These pieces involve a number of angled cuts, primarily at the "leg angle" discussed above. Set your miter saw carefully to this angle and leave it there throughout construction.. use other means to cut at other angles. This approach ensures that all of your angled cuts will "match." If the angle itself is off, your dimensions will change but the piece will still work. Each joint should be secured with two 1/4" bolts (dots indicate a good pattern for the upper brace). The distance between the floor and lower cross-brace isn't critical, but should be a couple of inches or so. Cut and attach this piece last, using the assembled end to determine its length.
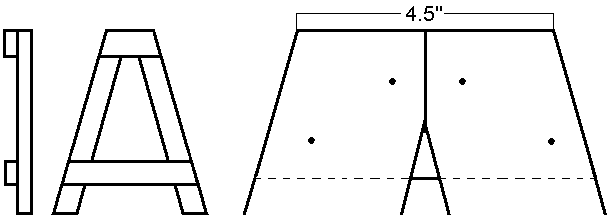
The top of each end should be narrower than the horse top. This bit of overlap prevents an occupant from scratching themselves on the upper brace ends. If the top is 2x6, end tops should be the indicated 4.5" for a .5" overlap on each side.
A nice touch on the ends is to cut tight grooves to hold the 2x4 side braces that run along the sides. This approach virtually eliminates end-to-end rocking in the finished piece. To do so, rabbit appropriate grooves in each leg as shown prior to end assembly. They should be .75" deep, and snug on the width of a 2x4.

Top and Side Braces
The remaining three pieces of the basic horse are simple, with no angled cuts. Cut the two 2x4 side braces to the length of your horse. Cut the 2x6 top 1" longer, allowing for .5" overlap on each end. Secure the side braces to both ends using lag bolts... one at each joint if you cut rabbits into the legs and two if you didn't.
The top can bolt of screw on. Either way, go into the brace, not the top of the legs, since you want to avoid going into the end grain. If bolts are used, sink them under the surface by drilling a 1" recess around the holes. Countersink screw heads. Fill resulting holes unless you plan to pad the top.
Finishing
As usual, sand everything well. Pay particular attention to the upper edges and corners of the top. On a flat surface, test stability. You may need to sand or even cut one or more legs. Ideally, the bottom of all four legs are squarely on the ground. Finish as desired.
Add attachment points to your taste and depending on need.
Padding the Top
Padding the top (and many parts of other projects) can make the horse much more comfortable, and isn't difficult. See the Apholsery section of the Techniques page. This is a good first apholstery project, as you have .5" of overlap on all sides to tack under.
Making It Better
There are a number of accessories that can be permanently or temporarily added to the horse. The diagram below shows starter ideas for platforms, handles, and a kneeler attachment that convert a horse into something like the kneeler project.
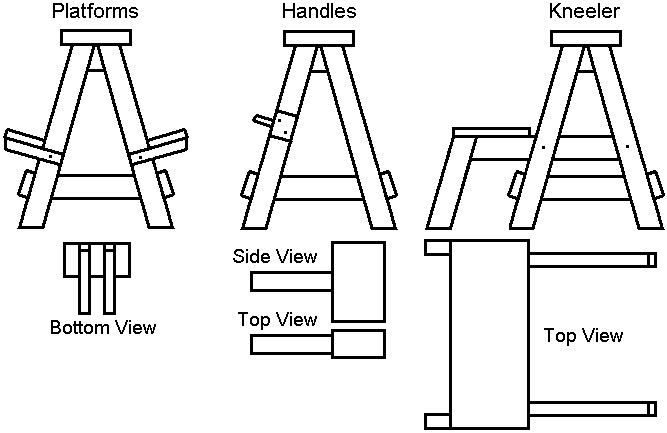
Platforms can be placed for both knees and elbows, and should be padded. They greatly increase the comfort of a prone straddle position for extended periods.Handles are obviously only good for hands. The design above is extremely simple.. just 2x4 and dowel. In designing the kneeler attachment, plan a natural distance between the knees (new, lower platform) and chest (original platform). Planned correctly, all three accessories could bolt through the same holes (change the handle design to use a single hole). With a series of holes down each leg, four platforms, two handles, and a kneeler attachment, the basic horse can become extremely versitile.