Locking Restraints - BDSM furniture Workshop


articles and tutorials BDSM workshop
The basic staple of secure bondage is a set of locking restraints. One common design can be used for wrist, ankle and thigh restraints, and even collors and belts. The design presented here is simple and fast to make.
Difficulty: Easy
Tools
Mallet, Utility Knife, Scissors, Square, Rivet Setter, Punch, 1" Oblong Punch, Edge Beveler #2, Edge Slicker, Strap-Cutter (optional)
Parts Checklist (per pair)
Medium Rivets
Plate Staple (2)
Leather Checklist (per pair)
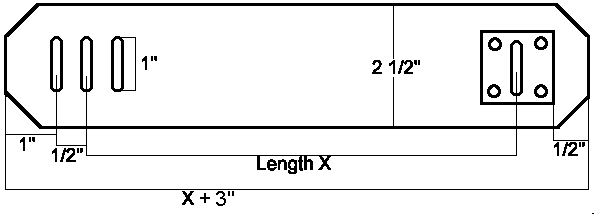
Base Strap (2): X+3" x 2.5"
Steps
1 - Measure
Measure the circumference of the target location (i.e. measure around the wrist for wrist restraints). Add ? to ? inch for comfort. Add ? to ? inch for lining, if desired. This measurement is 'X' in Diagram 1 below.
2 - Cut Leather
Cut the leather straps that form the restraints. The easiest way to do this is to cut a 2 ?" strap from a piece of leather using the Strap-Cutter, then cut to size with a Square and Utility Knife. Make sure the ends are square (perpendicular) to the sides. Next, trim each corner. You can either trim off a small triangle as shown, or round slightly with scissors.
3 - Punch Plate Staple Holes
Four rivets will hold the plate staple to the strap. To make these holes, position the plate staple ?" from one end, centered across the strap's width. Mark the position of these holes, remove the plate staple, and punch all four holes into the strap with a Hole Punch.
4 - Punch Tongue Holes
The hoop of the plate staple will slide through one or more tongue holes in the opposite end. These holes are punched using a 1" Oblong Punch. The positioning of these holes is important for a quality appearance. It is wise to make a template from a scrap of leather, also 2 ?" wide, to ensure consistent positioning. Place the template on top of the strap and lightly punch through the template into the second piece. This results in clear marks in your strap. Remove the template and punch the tongue holes the rest of the way through.
5 - Finish Edges
You are now done working the strap, and should finish the edges before attaching hardware. Use a #X edge beveller to bevel all outer edges, top and bottom. Rub all of the outer edges briefly with an edge slicker and apply Edge Coat. Allow to dry, about 15 minutes.
6 - Attach Plate Staple
Firmly attach the plate staple with four medium rivets. The rivet base should be on the inside, the cap on the outside.
7 - Lining, Optional
If you want to line your restraints, I recommend either a nice suede or felt. Cut a piece of lining slightly wider than the strap, and slightly longer than the distance between the plate staple end and the first tongue hole. This is the area that will be lined. Lay the lining on a flat surface, with the side to be glued up. Coat the inside of the strap below the first tongue hole liberally with Fabri-Tac. Starting from the first tongue hole, firmly lay the strap (glue-side down) onto the lining. Press down hard for several seconds. Allow the glue to set, then trim off the excess lining carefully with a pair of scissors.
Diagram 1
Adding D-Rings
While the loop of the plate staple can be used to lock the restraint to something, as well as on someone, one or more additional D-rings can be a nice addition to the basic restraint described above. Add the following steps to those above.
Step 2.5 - Cut D-ring Strap
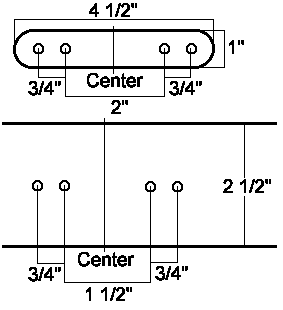
Each additional D-ring requires a small strap of it's own. Diagram 2 shows this strap with a four-hole configuration. You can also use two-hole D-ring straps by ignoring the outer holes and using a length of 3", if this ring won't take a lot of stress. Again, it is nice to use the Strap-Cutter to make a long piece of 1"-wide stock and just lop off the length you need. Cut the corners to the shape of your choice.. this is a good opportunity to use the Belt-Ender if you have one, or just make a point as shown in The Finished Product picture.
Step 3.5 - Punch D-ring Holes
Punch four holes as shown in Diagram 2 in both the primary strap and D-ring strap. All holes should be made relative to 'Center', the place where you want the D-ring to end up. Note that the holes in the D-ring strap are farther from center than those on the primary strap. This is because the ring has to fit in there, and should be able to move freely.
Step 5.5 - Finish D-ring Strap Edges
Do the same finish work described above to the D-ring strap, but do not bevel the bottom edges. This allows the piece to sit more naturally on the primary strap.
Step 6.5 - Attach D-ring
Attach the D-ring strap to the primary strap using four (or two) medium rivets. Obviously, the D-ring itself needs to end up in between!
Diagram 2
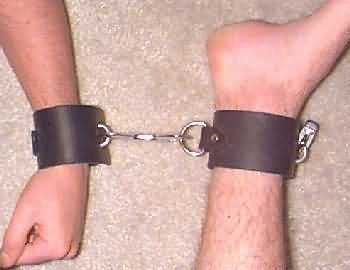
The Finished Product
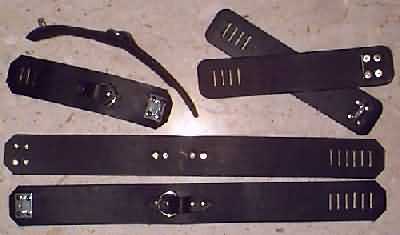
In the picture above, clockwise from upper left:
Locking wrist restraints with D-ring, felt-lined. Two-rivet D-ring strap.
Locking ankle restraints, unlined. Note the different construction, with the plate of the plate staple beneath the primary strap. A small square of leather provides a bit of padding over the plate.
Locking thigh restraints with D-ring, unlined. Four-rivet D-ring strap.
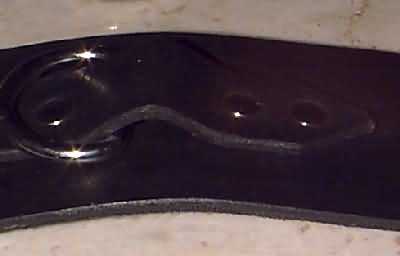
Here is a close-up of the D-ring strap on the thigh restraints above. You can see the hump that allows the ring to move freely, and the beveling on the top edge.