Box Stocks - BDSM furniture Workshop


articles and tutorials BDSM workshop
Box stocks are simple devices, small and easy to build. They hold an occupant's wrists and ankles securely in a fixed position, making them remain hunched over and stationary. They can be very uncomfortable for longer times. The position is excellent for spanking and other impact activities, although hard blows could knock the occupant over or cause their knees to buckle. Buckling knees while in a box stock can easily break an ankle.
Difficulty: Moderate
Finalize Design
Let's take a look at the overall design:
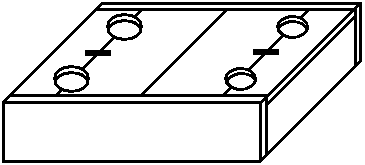
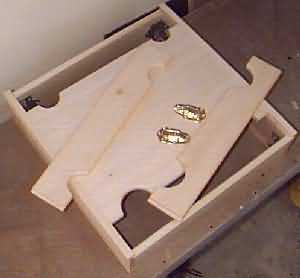
These stocks aren't much more than a box. The top consists of four boards, all of which fit into channels in the sides. The two outermost stock boards slide freely, and are removed to enter the piece. They lock to the center boards (which are glued in place) with draw latches. A bottom (floor) for the box is optional. If you plan to use it mostly on a carpeted surface, leave the bottom out. Otherwise, you might add a bottom and pad it for comfort. I'll mention a single addition after the basic plan.
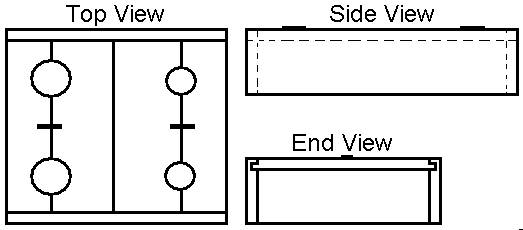
The size of box stocks makes a huge difference in comfort to the occupant, particularly the distance between wrist and ankle holes. The easiest way to size the design is to have your target crouch in a position like this and measure things:
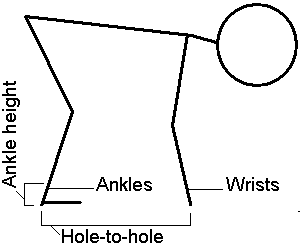
Wrists and ankles are diameter measurements at the widest point, and translate to the size of these holes. The lower leg will be angled to some extent, increasing the required hole size, so leave some slack here. Hole-to-hole is the distance between hole centers (ankle vs. wrists), and as stated will influence the occupant's comfort. You might want to have your target hold position for a while to get a feel for expected comfort. Ankle height provides clearance for the foot body. The bottom of ankle restraining board must be this height or more from the floor of the box, or the board will actually rest on the foot. If you have no box bottom, total box height is this measurement plus thickness of restraining boards. If you plan a bottom, add in its thickness.
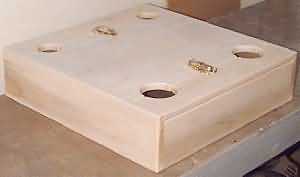
Box stocks can be built from structural lumber, but hardwood is an excellent choice for this project. Because it is small, the expense is relatively low. The work-in-progress pictures above shows mine, built with poplar. You may wish to add a handle for easier carrying, and could even use the box as a storage or transport case for other items.
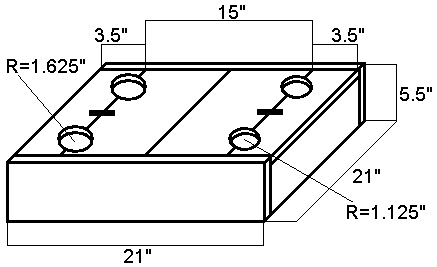
Here are my final dimensions (Yours might vary! Adjust the instructions below accordingly.):
Cut Wood
After finalizing your design, it's time for the chip to fly. The box pictured above was built from 4' of 1x4 (outer stock boards), 8' of 1x6 (sides and ends), and 4' of 1x8 (center top boards). This approach and the availability of hardwoods is a variety of sizes makes construction quite simple.
Cut to Length
Note that the following instructions are suited to the measurements indicated above.
First, cut the two ends to exact length, 19.5". Next, cut the four top boards. These boards will have a 1/4" lip on each end running in channels in the sides. Cut all four to exactly 20" Line these boards up on a table in their final position. Measure the depth of the four together to get an accurate box depth. This is the length of the two sides.
Rip Ends
If you're using the boards described, the ends need to be ripped on a table saw. Remove 25/32" (1/32" over 3/4") from the width of both end boards. This little extra bit of space ensures that the outer stock boards will slide freely past the ends.
Channels and Lips
This step is best done on a router table, but can be done with a table saw as well. You are going to run a groove the length of each side, and make a lip on both ends of each of the four top boards. How well the box stocks work will depend on the accuracy of this step. Look at this diagram to see how the parts fit together:
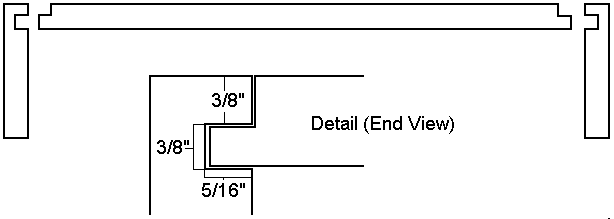
Start with the side channel. It is going to be 3/8" wide, 5/16" deep, and 3/8" below the top of the side piece. The best way to cut it is with multiple passes on a router table, with 1/4" straight bit. The extra depth will ensure smooth motion for the mobile stock boards and tight fit for the stationary ones. The two sides should be mirror images, if you care which face of the board is visible.
Next, remove wood to make the lip in both ends of all four top boards. Again, it is easiest to route. The remaining lip should be 3/8" high and protrude by 1/4". After running all four boards, adjust the setup and take an additional 1/64" off each direction on the outside stock boards. Again, smooth slide.
Clamp the sides and ends into position, forming the box frame. Make sure the top boards fit into the channels properly, and leave them there for the next step.
Cut Holes
With the top boards clamped snugly together in the box, mark the ankle and wrist holes in the proper places. Remove the boards and cut out these holes with jig or scroll saw and finish them up with a drum sander.
Edges
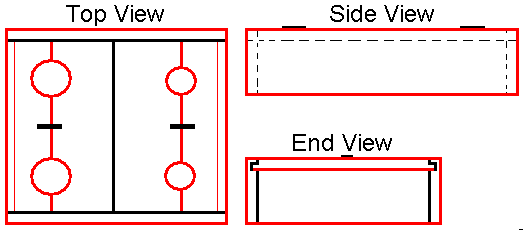
If your wood is like mine, the edges are quite sharp. Use whatever method you prefer to smooth out accessible edges. I rounded inside the holes and beveled everywhere else, all with the handy-dandy router. The diagram highlights the edges that need attention. The thin red lines in the top view indicate the top, inner edge of the end boards.
Assembly
Finaly assembly of this project is quite simple. Start with the box section, comprised of the ends and sides. Glue and clamp, ensuring that all corners are square. Four box clamps are nice for this, and you might want to add a strap clamp as well. Before the glue dries (about 30 minutes for wood glue), test the setup by sliding all top boards into place. Make sure the end stock boards slide freely, although the center boards should be snug-to-tight.
While the glue dries, you can screw in the angle irons. I added these because they were easy and I don't like glue-only joints. You can also insert the two center top boards now. Before putting them in place, run a small bead of glue on the bottom of the channel where they sit... no glue in the channel within 3.5" of the ends, though! Also glue the two surfaces of these boards that meet in the middle. Clamp tight, ensuring that they're properly positioned along the channel. Flip and wipe off excess glue.
You're basically done. Sand and finish. Attach draw latches. Enjoy.