Knots: French bowline | tutorial for beginners


articles and tutorials Bondage tutorials for beginners Rope bondage knots tutorial
The French bowline - used as cuffs for hands or feet
This is the one we are going to use for tying each of our submissive’s limbs.
Is the same as the bowline, but the rope coils several times inside the loop and around the limb (the rabbit goes out of his hole several times before going around the tree and getting back into the hole) (Peculiar animal happens to be this rabbit).
We use this for tying a sub with extended arms or spread-eagled, because the rope’s tension spreads on the several loops, so it is less likely to damage the skin or nerves or leave bruises.
The completed “cuff” takes about 3ft 8” (1,10 m), with a 5/16 (8mm) rope
You begin as in the bowline (remember that the rope passes over itself on the first loop), but after entering the loop...
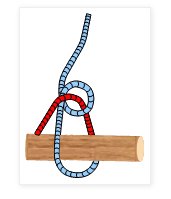
...instead of going around the cord, loops again around the object…
…several times (three or four, according to the rope’s diameter, more for a thin rope, less for a thicker one) around the limb, neither too loose nor too tight, just enough for the sub not being able to slip the wrist or ankle…

…and the last time, it finishes as the bowline, going around the rope, and back into the loop.
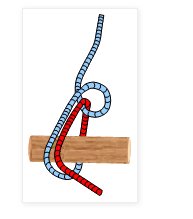
This, before tightening the knot, is the moment for working with the rope, sliding and pulling the loops until they fit snugly and neatly around the limb...

This is how it will look on your sub (with the rope over the palm and the pressure of the cuff on the back of the wrist, which is less dangerous).

The process of binding the sub could be faster if you have several of these “cuffs” prepared in advance, for just tightening them on your sub’s limbs when needed.