Nipple Stretcher - BDSM furniture Workshop


articles and tutorials BDSM workshop
This device is a nice compliment to any pair of small clamps, particularly clovers as they get tighter when tugged. It's basically a simple arrangement that puts an even and constant pull of both nipples by pulling a pair of clamps away from the chest. This design is very adjustable in terms of pull, using a threaded rod to screw the clamps away from the body.
Note that the finished item pictures have a threaded locking hole in the clamp bar that isn't depicted in the diagrams. This project was initially constructed without the adjusting rod mechanism. The final approach described in this plan is much more effective, and worth the extra effort.
Difficulty: Easy
Special Tools:
Hacksaw with fine-toothed blade or metal-cutting blade for miter/table saw, 1/4"-20 bottom tap w/ handle, fine metal file, drill press. Note that this project requires accurate vertical drilling, and trying it without a drill press is not recommended.
Finalize Design
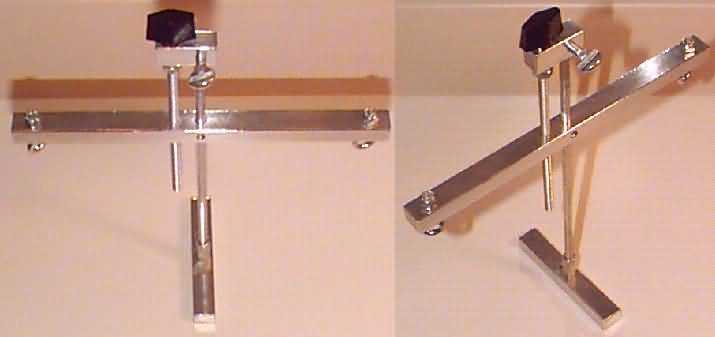
Let's take a look at the overall design:
First, note that the view directions (i.e. "top view") assume that the stretcher in in place on someone lying down. The "front view," for example, is the side facing them in this position.
To make the design more specific, you need three pieces of information:
- First, the nipple-to-nipple distance of your target recipient, which may be about 8 inches. Measure between nipples as they hang naturally, while the person is standing comfortably erect. This measurement determines the length of the clamp bar.
- Second, understand how far away from the chest surface these nipples stretch. This is a fun measurement ;) Grab a nipple and pull directly away from the chest. Measure from center-chest (between the breasts) to the nipple body (eyeball the distance while measuring square to the chest... don't slant the ruler over to the breast/nipple).
- Third, identify the longest type of clamp you want to use with the stretcher and measure its length. Add these measurements 2 and 3, 1" for clamp attachment, 1" for extra tug, and 3/4" of bar thickness. This sum is the minimum length of the required 1/4" bolt.
The clamp bar is at least 1/2 square aluminium stock, and is 1" longer than the nipple-to-nipple measurement made earlier. Mine is 3/4" x 5/8" bar stock, 9" long.
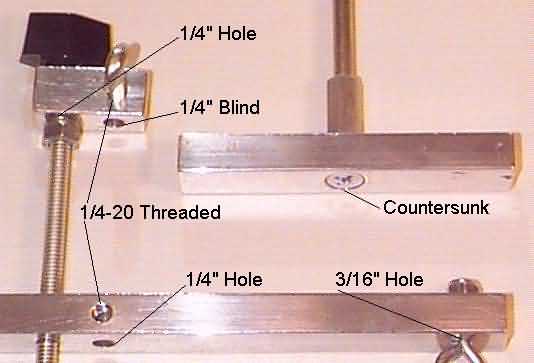
The foot rests against the occupant's chest, between their breasts. It is made of the same bar stock as the clamp bar, and has a single countersunk hole for a 1/4" machine screw going into the coupling nut. This screw secures the coupling nut to the foot.
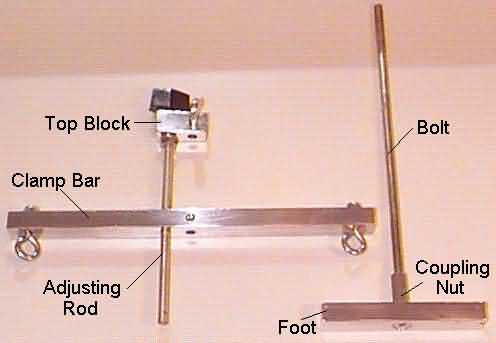
The adjusting mechanism consists of the top block and adjusting rod. The top block rests atop the bolt, locking in place with a thumbscrew. It holds the adjusting rod, a length of 1/4" threaded rod. This rod goes through a threaded hole in the clamp bar. When the knob on adjusting rod is turned, the clamp bar goes up or down on the bolt.
Construction
This is a very simple project to build. It is a bit time consuming simply because you're working in metal. For me, polishing took about twice as much time as construction itself. Note that we're using 1/4"-20 bolts and threading throughout. This is typically refered to as "coarse" in a 1/4" bolt (1/4" is the bolt diameter, 20 is the number of threads per inch).
Aluminum Bar
Any industrial metal supplier will have 1/2" x 1/2" aluminum bar stock. You can use slightly larger aluminum bar, and might get discounted pricing from the cutoffs bucket. You can easily cut the aluminum with a fine-toothed hacksaw, but professional-looking ends will require extensive filing or a metal cutting blade on table or miter saw. Note that aluminum clogs and ruins standard griding wheels. DON'T cut all lengths of bar as your first step!
Cut the appropriate length of bar stock for the clamp bar. You need to drill four holes, as shown in the diagram above. All four holes are drilled in what will be the "top" of the bar.. the side facing away from the wearer. The small eyebolts to which clamps attach run through appropriately sized holes 1/2" from each end. The 1/4" bolt shaft runs through a 1/4" hole drilled through the center of the bar.
The fourth hole is drilled to a #8 wire size bit (appropriate to a 1/4-20 tap), about 3/4" to either side of the center hole. This distance isn't critical, but must be copied on the top block. Thread this hole and the clamp bar is complete, except for any smoothing or polishing you'd like to do.
Next, drill the three required holes for the top block before cutting it from the longer piece of remaining stock. This makes it much simpler to clamp. The distances here are not critical, except that between the two holes in bottom face which should be identical to that between the matching holes in the clamp bar. Leave about 1/2" between these holes and respective ends of the top block.
The foot is also depicted in the diagram above. It should be at least 4" long, although longer is OK too. Drill a 1/4" hole in the center, then countersink on bottom enough to clear the head of a 1/4" machine screw.
Bolt and Adjusting Rod
The bolt is an easy modification. Cut off the head and round/smooth the resulting end. Cut a length of 1/4-20 threaded rod to the length of the bolt minus about 3". Smooth and finish both ends, clearing the threads.
Finishing Up
Polish your aluminum pieces before assembly, if you plan to do so. Also, note that some of the bolts may need to be cut to get the right length.
Secure a coupling nut to the top side of the foot with a 1/4"-20 machine screw (foot bolt in topmost diagram). This screw should be long enough to reach halfway into the coupling nut. Tighen well.. you might also want to apply some LocTite, as this is a permanent connection. Screw the bolt into the other end of the coupling nut. You may want to cut down the threaded section for aesthetics.
Attach two small eyebolts in the proper holes. This is best done with aircraft locknuts, but can be applied tightly with regular nuts as there isn't much force here. They made need tightenning occasionally, though. You can remove any excess threaded section from the eyebolts.
Run a 1/4" aircraft locknut about 2" down the threaded rod. Pass this 2" end of the threaded rod through the appropriate hole in the top block. Screw on a plastic knob with female threaded insert. Tighten the knob as much as possible, then back the locknut almost against the top block (do NOT tighten!).
Screw the adjusting rod into the clamp bar. Slide clamp bar onto bolt, and top block onto top of bolt. Screw thumbscrew into top block, locking it against bolt. Check the "action" by screwing the clamp bar up and down a bit. If it binds, the problem is probably the locknut on adjusting rod.
You need a way to attach clamps. Options include split rings, S-hooks, opening the eyes enough to slide on a clamp, or permanent attachment by opening and reclosing the eyes. The best approach depends on the clamps you'll be using, and whether or not you want to use them without the device.
Improvements
Aesthetics
Polishing the components of this device is simple, and can have a great visual impact. See the Copper-handled Floggers project for polishing techniques.
Harness
As described, the stretcher is held in place only by force applied to stretch the nipples. This leaves an interesting threat... it makes the occupant work to keep the tension on, since the alternative is suffering much more force as the unit slides free and dangles by the nipples.
However, you might want an optional or permanent harness. A temporary harness is easily made with rope windings in a criss-cross pattern. More complex harness could be made, and you might want to get ideas from Working With Leather.
Combination Devices
Take a moment to think about combination devices. For example one could easily build a breast press with integrated stretcher, which might be interesting. Back to the Breast Torture Page